Title here
Summary here
Facing key advertising challenges? Take control of your tracking: audit, optimization, GDPR compliance, CMP, Consent Mode v2, and server-side tagging.
Contact LucasMeasuring and understanding user behavior is an essential part of improving a mobile application. This is exactly the role of Firebase Analytics, the analytics solution offered by Google and integrated into the Firebase ecosystem.
Thanks to this free, powerful tool, you can :
In this step-by-step tutorial, we’ll show you how to install Firebase Analytics in an Android app freshly created with Android Studio. Even if you’re just starting out, you’ll be guided from the creation of the Android project right through to the verification of events in Google Analytics.
Before starting this tutorial, you’ll need to install the latest version of Android Studio.
What is Android Studio?
Android Studio is the official development environment for creating Android applications. It’s a free software package from Google that includes :
In short: Android Studio is the equivalent of Xcode for iOS.
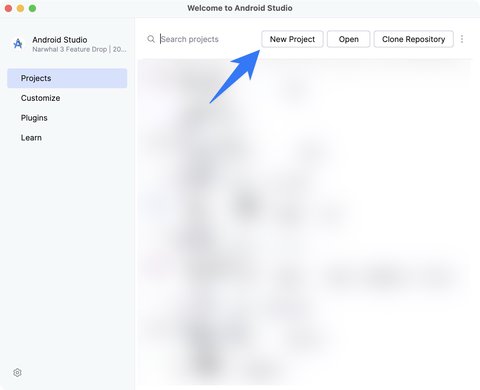
In Android Studio, create a new project.
Then select the Empty Activity model to avoid starting with a completely empty project.
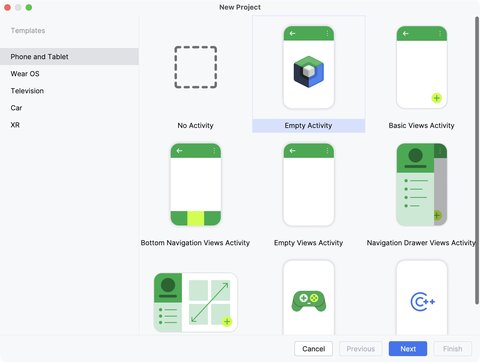
Click on Next.
Next, give your application a name and a package name.
Make a note of the package name you choose at this stage, as you’ll need it later. In this example, I choose com.example.dmsdemoapp.
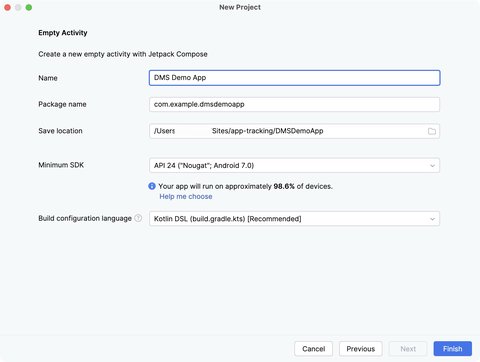
Then click Finish.
Congratulations, you’ve just created an Android application.
What is an emulation device?
An emulation device (or Android emulator) is a virtual version of an Android smartphone that you can launch directly in Android Studio.
It lets you :
It’s the ideal tool for quickly developing and debugging your apps, especially if you don’t yet have an Android device at hand.
If you haven’t added a device, you’ll probably get the error No target device found when trying to launch your application.
To launch your application, you’ll need to add an emulator.
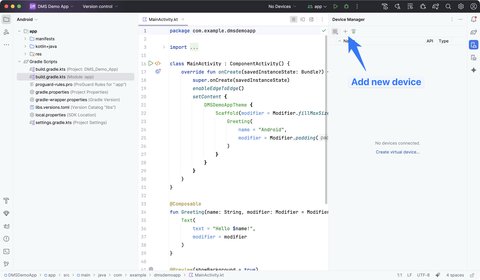
Open the Device Manager in Android Studio.
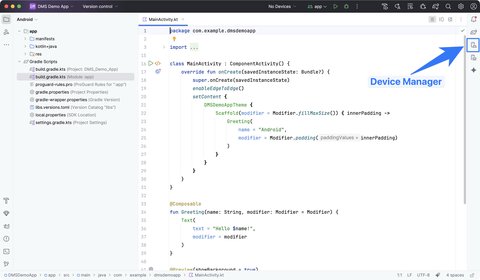
Once the Device Manager is open, click on the + icon to add a new device.
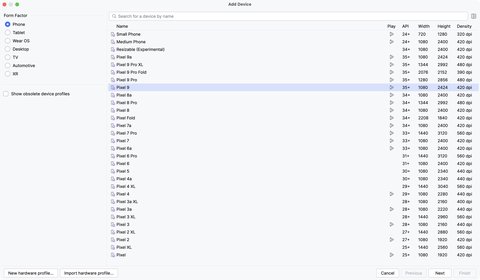
A list of devices appears on the screen, choose the device of your choice. In this example, I choose the Pixel 9.
Then click on Next, and you’ll see the screen below.
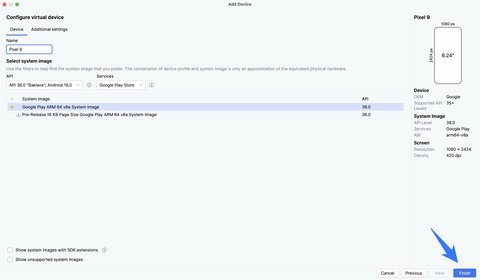
Finally, click Finish.
The device now appears at the top of the screen and will be used when the application is run.
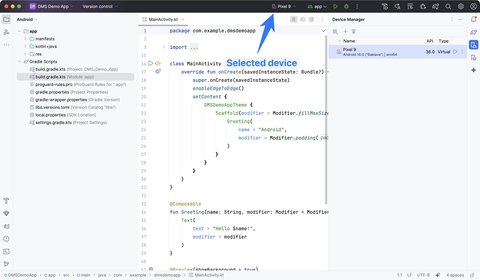
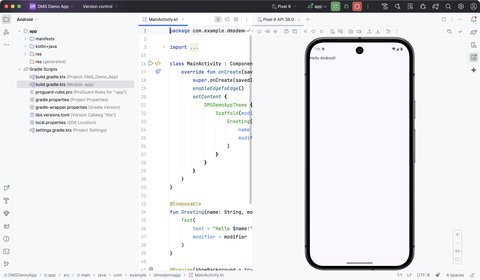
Even if you haven’t yet installed Firebase at this stage, it’s important to run the application to ensure that the Android Studio project works properly.
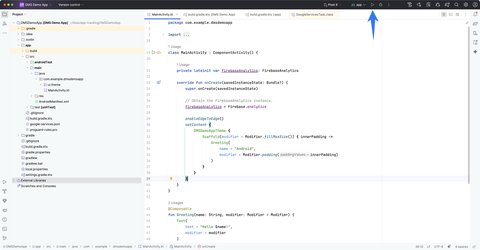
Click on the play icon in Android Studio.
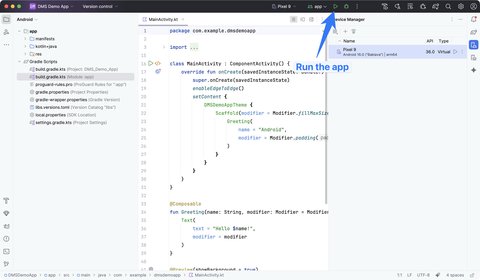
After a few seconds, you should see the Android phone displayed with the text Hello Android!.
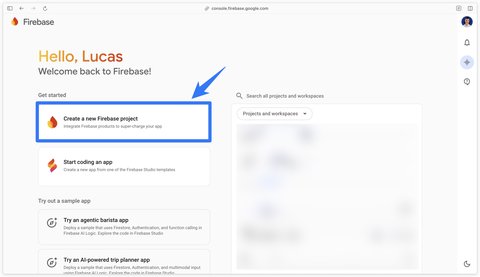
Before adding Firebase to your Android app, you need to create the project in Firebase.
Go to the Firebase console -> https://console.firebase.google.com
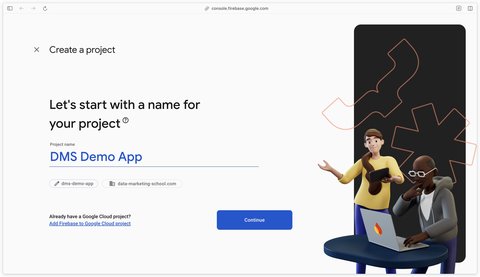
Then name your project and associate it with a Google Cloud organization.
Next, check the Enable Google Analytics for this project box. If you haven’t already done so, you can do so later.

You must now choose whether to associate the app feed with an existing Google Analytics property or with a new property. In this example, I’ll create a new property.
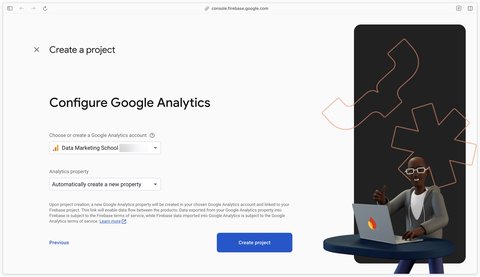
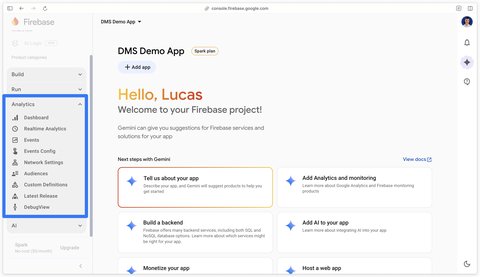
Then click on Create Project. After a few moments, you’ll be taken to a Firebase project interface containing a Analytics section.
You can also see in Google Analytics that the property has been created.
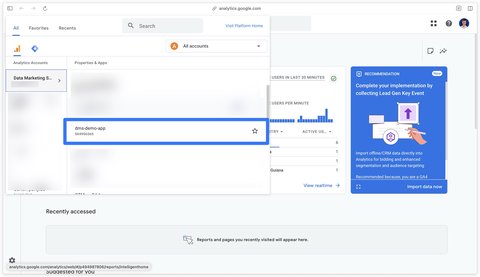
However, the property doesn’t yet contain a data stream, which is what you’ll create in the next step.

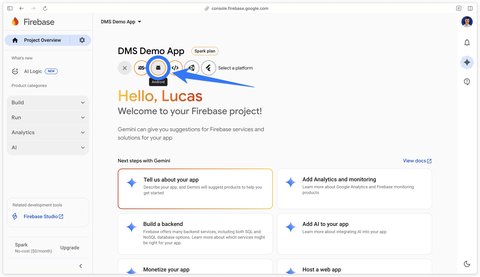
In the Firebase project you’ve just created, click on the Add app button.
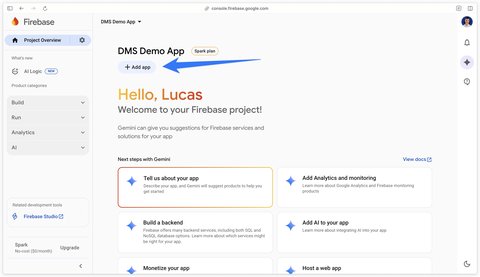
Then select the Android platform.
This takes you to the configuration of your Android app flow. Here you need to enter your app’s Package Name, in this example com.example.dmsdemoapp.

Click on Register App.
Next, you need to download the configuration file google-services.json.
Good to know
The configuration file in an App data feed is equivalent to the G-XXXXXXX measurement identifier of a Web data feed in Google Analytics. Firebase Analytics will then know which feed to send the data to.
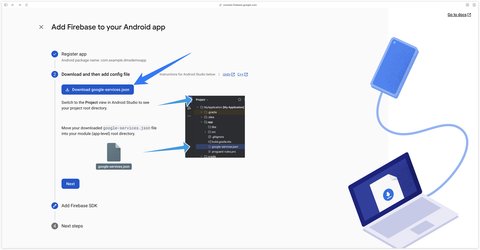
Here’s what the downloaded google-services.json file looks like.
{
  "project_info": {
    "project_number": "446224764507",
    "project_id": "dms-demo-app",
    "storage_bucket": "dms-demo-app.firebasestorage.app"
  },
  "client": [
    {
      "client_info": {
        "mobilesdk_app_id": "1:448629064907:android:8fe81523c10cb48f9f074e",
        "android_client_info": {
          "package_name": "com.example.dmsdemoapp"
        }
      },
      "oauth_client": [],
      "api_key": [
        {
          "current_key": "AIzaUyAQSnp1p4TuZoGi8Yh0kooNEA0yZPmzfSY"
        }
      ],
      "services": {
        "appinvite_service": {
          "other_platform_oauth_client": []
        }
      }
    }
  ],
  "configuration_version": "1"
}
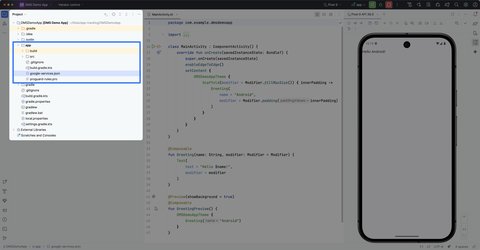
You then need to add the google-services.json file to your Android application’s app folder.
Astuce
We recommend using the Project view in the Android Studio file manager to display all the application’s folders and files.
Attention
Your configuration file must be named exactly google-services.json for it to be considered by Firebase.
Now it’s time to install the Firebase SDK in your Android app and activate the Google Services plugin.
What is a dependency, an SDK, a plugin?
SDK definition
An SDK (or Software Development Kit) is code external to your Android application that can be imported via Gradle. (examples: Firebase, Facebook SDK for Android)
Dependency definition
A dependency represents an SDK that your project needs to function properly. For the purposes of this tutorial, you’ve installed the Firebase SDK in the dependencies of your Android application project.
Plugin definition
A plugin allows you to customize the build of your Android application. Here, the Google Services plugin lets you add just 2 lines of code to MainActivity.kt to make Firebase Analytics work.

First, you need to modify the DMSDemoApp/build.gradle.kts file at the root of your project.
1// Top-level build file where you can add configuration options common to all sub-projects/modules.
2plugins {
3    alias(libs.plugins.android.application) apply false
4    alias(libs.plugins.kotlin.android) apply false
5    alias(libs.plugins.kotlin.compose) apply false
6
7    id("com.google.gms.google-services") version "4.4.3" apply false
8}
Then you need to add the Firebase SDK dependencies and activate the google-services plugin in DMSDemoApp/app/build.gradle.kts.
 1plugins {
 2    alias(libs.plugins.android.application)
 3    alias(libs.plugins.kotlin.android)
 4    alias(libs.plugins.kotlin.compose)
 5
 6    id("com.google.gms.google-services")
 7}
 8
 9android {
10    namespace = "com.example.dmsdemoapp"
11    compileSdk = 36
12
13    defaultConfig {
14        applicationId = "com.example.dmsdemoapp"
15        minSdk = 24
16        targetSdk = 36
17        versionCode = 1
18        versionName = "1.0
19
20        testInstrumentationRunner = "androidx.test.runner.AndroidJUnitRunner"
21    }
22
23    buildTypes {
24        release {
25            isMinifyEnabled = false
26            proguardFiles(
27                getDefaultProguardFile("proguard-android-optimize.txt"),
28                "proguard-rules.pro"
29            )
30        }
31    }
32    compileOptions {
33        sourceCompatibility = JavaVersion.VERSION_11
34        targetCompatibility = JavaVersion.VERSION_11
35    }
36    kotlinOptions {
37        jvmTarget = "11"
38    }
39    buildFeatures {
40        compose = true
41    }
42}
43
44dependencies {
45
46    implementation(platform("com.google.firebase:firebase-bom:34.2.0"))
47    implementation("com.google.firebase:firebase-analytics")
48
49    implementation(libs.androidx.core.ktx)
50    implementation(libs.androidx.lifecycle.runtime.ktx)
51    implementation(libs.androidx.activity.compose)
52    implementation(platform(libs.androidx.compose.bom))
53    implementation(libs.androidx.compose.ui)
54    implementation(libs.androidx.compose.ui.graphics)
55    implementation(libs.androidx.compose.ui.tooling.preview)
56    implementation(libs.androidx.compose.material3)
57    testImplementation(libs.junit)
58    androidTestImplementation(libs.androidx.junit)
59    androidTestImplementation(libs.androidx.espresso.core)
60    androidTestImplementation(platform(libs.androidx.compose.bom))
61    androidTestImplementation(libs.androidx.compose.ui.test.junit4)
62    debugImplementation(libs.androidx.compose.ui.tooling)
63    debugImplementation(libs.androidx.compose.ui.test.manifest)
64}
Once these files have been modified, you need to click on the Sync now button in Android Studio to retrieve the Firebase Analytics and Google Services plugin code.
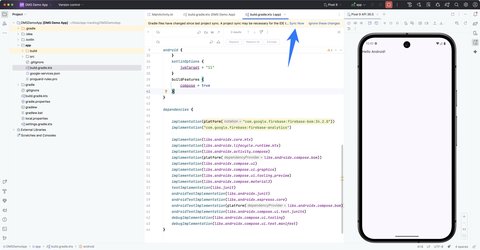
Now that all dependencies are imported, you’ll use Firebase Analytics to send a screen_view event to the app android stream of your Google Analytics property.
To do this, you need to modify the code of the MainActivity class in the MainActivity.kt file.
 1class MainActivity : ComponentActivity() {
 2
 3    private lateinit var firebaseAnalytics: FirebaseAnalytics
 4
 5    override fun onCreate(savedInstanceState: Bundle?) {
 6        super.onCreate(savedInstanceState)
 7
 8        // Obtain the FirebaseAnalytics instance.
 9        firebaseAnalytics = Firebase.analytics
10
11        enableEdgeToEdge()
12        setContent {
13            DMSDemoAppTheme {
14                Scaffold(modifier = Modifier.fillMaxSize()) { innerPadding ->
15                    Greeting(
16                        name = "Android",
17                        modifier = Modifier.padding(innerPadding)
18                    )
19                }
20            }
21        }
22    }
23}
Once you’ve made these changes, you can launch your application.
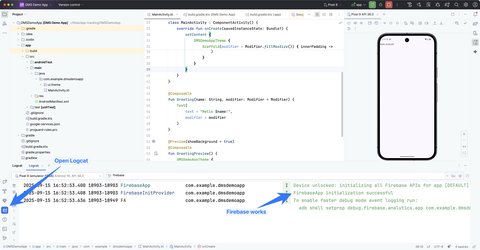
Once the application has been launched, you can open Logcat to check that Firebase has run correctly. You should see the message FirebaseApp initialization successful.
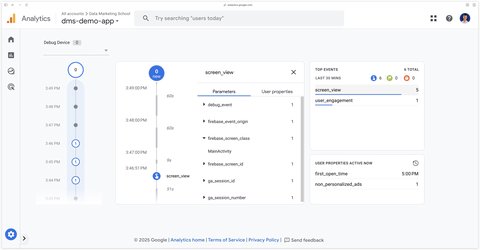
In Google Analytics, open the property that contains the Android app feed. You should see this in the real-time report.
3 events are visible:

To view events in the Debug View, you must first activate debug mode in Firebase Analytics.
To do this, run the following command adb shell setprop debug.firebase.analytics.app <package_name> in your terminal.
adb shell setprop debug.firebase.analytics.app com.example.dmsdemoappOnce the command has been executed, you need to restart your application. You should then see the message Faster debug mode event logging enabled. in Logcat.
After a few minutes, you should see a screen_view event arrive in the Google Analytics Debug View.
Don’t hesitate to restart the application several times if you don’t see anything appear in the Debug View.
Here’s the command to disable debug mode.
adb shell setprop debug.firebase.analytics.app .none.App tracking with GTM Server-Side lets you add just one SDK to your mobile application (the Firebase Analytics SDK) to connect all your platforms.
Your app data stream will be sent to your sGTM server instead of directly to GA4, and sGTM will then dispatch this data to your platforms (GA4, Meta, Tiktok, etc.).
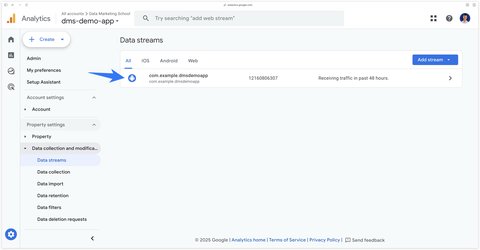
To send your data to an sGTM endpoint, you need to modify your data flow configuration in GA4. To do this, go to your GA4 > Admin > Data stream property.
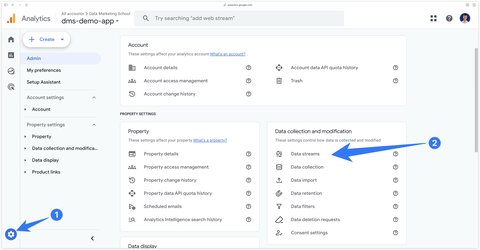
Then click on the Android data stream.
Good to know
If you have multiple App data streams, such as an iOS stream and an Android stream, you’ll need to make this configuration on each stream.
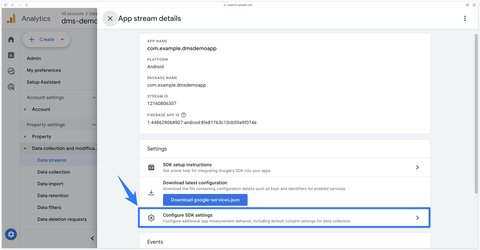
In your data stream, click on Configure SDK settings.
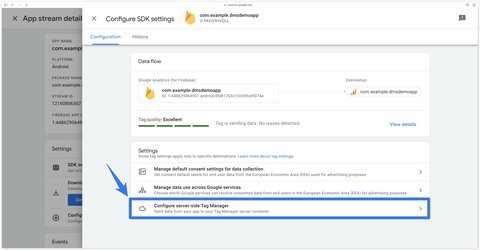
Next, click on Configure server-side Tag Manager.
Next, enter the Server Container URL and determine what percentage of the data you wish to send to the server.
Good to know
If you’re in a test phase, you can set a percentage of 50% to compare server data vs. direct integration.
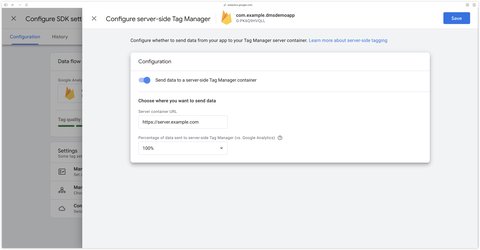
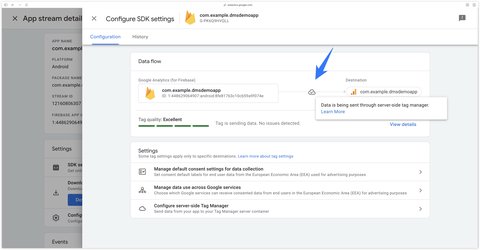
Then click Save. You should see this logo appear on your app feed.
A question about this article, need an audit of your setup or server-side migration? Drop me a line, I reply within 24h.
 Lucas Rollin