Title here
Summary here
Facing key advertising challenges? Take control of your tracking: audit, optimization, GDPR compliance, CMP, Consent Mode v2, and server-side tagging.
Contact LucasUpdated: Monday, May 11, 2026
Google Ads enhanced conversions allow you to improve conversion measurement, leverage more user data and optimize your campaign performance through more reliable tracking. With Google Tag Manager, you can set up this configuration without modifying your website code directly.
In this tutorial, we’ll see how Google Ads conversion tracking works, why it’s essential and how to configure it effectively. Whether you’re an e-commerce advertiser or in lead generation, this tutorial will help you set up more accurate Google Ads enhanced conversion tracking!
Reliable Google Ads conversion tracking lets you better drive your campaigns, improve your smart bidding strategies and make better marketing decisions.
A Google Ads conversion is an important event to analyze and optimize in the journey of your website visitors. It can be an event that has a direct or indirect impact on the company’s revenue.
For an e-commerce site, the purchase event is the most important to track. This conversion action lets you precisely measure the sales generated by your Google Ads ads and adjust your campaigns accordingly.
However, for a lead generation site, it will rather be form submissions. In this case, Google Ads enhanced conversions help to better link the form or user data to advertising performance.
In Google Ads, conversions allow you to understand which events are attributed to Google advertising. They also allow you to measure the performance of your campaigns, identify effective ads and optimize your smart bidding strategies thanks to the data collected.
There are two types of conversion actions in Google Ads:
Primary conversions generally serve as the main goal for your Google Ads campaigns, while secondary conversions allow for complementary tracking of the user journey on your website.
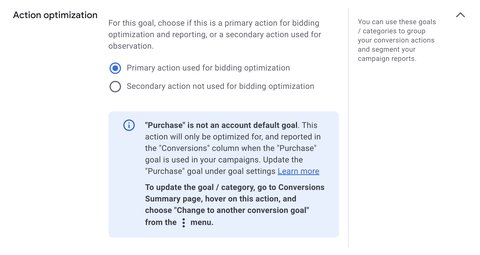
Here is a comparison table of these two conversion types:
| Criterion | Primary conversion | Secondary conversion |
|---|---|---|
| Goal | Main campaign goal | Complementary goal or performance indicator |
| Used for auto-bidding | Yes (Google uses it to optimize bidding) | No (does not directly impact bidding) |
| Performance measurement | Used to evaluate campaign success | Used to track actions of interest |
| Typical examples | Purchase, paid signup, appointment booking | eBook download, button click, page visit |
| Strategic impact | Drives Google Ads optimization decisions | Helps understand the user journey |
Distinguishing these 2 types of conversions helps avoid blurring the signals you send to Google Ads. This helps the platform better understand which conversion actions should be used to optimize your advertising campaigns.
Enhanced conversions consist of sending user data to Google Ads (example: email, phone number) in order to improve the match rate between your website visitors and people who have a Google account. This feature, also called enhanced conversions, allows you to improve Google Ads conversion measurement while using first-party data from your website. It also helps advertisers get more reliable data despite the limitations linked to cookies and user privacy.
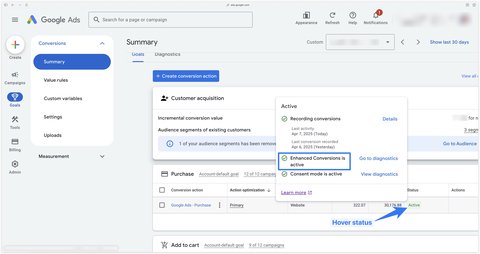
To know if enhanced tracking is enabled for your conversions, you can hover over their status and see if you have the green badge Enhanced conversions is active.
When this status appears, it means Google Ads is correctly receiving the information needed to activate enhanced conversions on your account.
From my experience, native Google Ads conversions are the ones that bring up the most conversions (with a similar attribution window). They often offer a more direct measurement of Google Ads conversions and make campaign optimization easier, particularly for smart bidding strategies.

I always recommend using native Google Ads conversions because I believe each platform should have its own tracking system and shouldn’t be dependent on another platform to function.
Before setting up a conversion action or Google Ads enhanced conversions, certain technical elements must be correctly configured. These prerequisites ensure reliable conversion measurement, proper campaign attribution and optimal functioning of Google Tag Manager.
The Conversion Linker tag is essential for Google Ads conversion tracking. It is one of the basics to set up to ensure correct tracking on your website.
Its main role is to detect the presence of the gclid parameter in the page URL and to drop a cookie if so (_gcl_aw). This allows the attribution of conversions to Google advertising.
This tag also drops another cookie _gcl_au, which is a browser identifier. This first-party data helps improve conversion measurement in Google Ads.
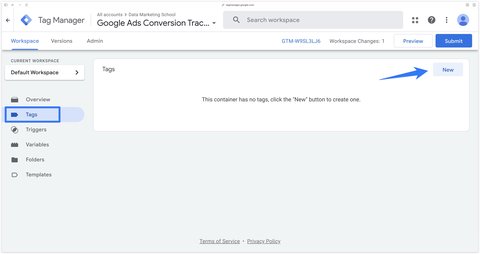
To configure the Conversion Linker, go to Google Tag Manager. In the Tags section, click New.
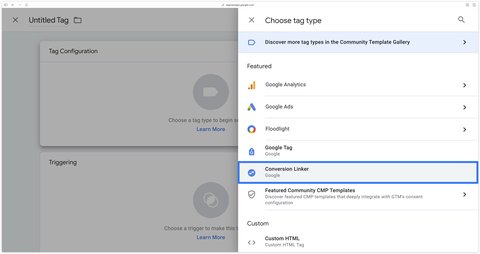
Then select the Conversion Linker in the list of proposed tags.
Trigger this tag on Initialization - All Pages. This trigger loads the tag from the very beginning of the page load.
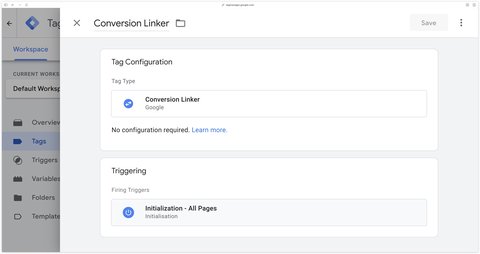
You have now finished configuring the Conversion Linker. You can then move on to the other steps of setting up Google Ads conversion tracking.
For Google Ads conversions to work correctly, you also need to implement Google Consent Mode V2 in order to send the consent signals ad_storage, ad_user_data and ad_personalization. These signals allow Google to adapt user data collection based on the consent given on your website and to preserve user privacy.
This is done by implementing a CMP such as Axeptio or Didomi. A properly configured consent management platform makes GDPR compliance easier while maintaining the most accurate conversion measurement possible.
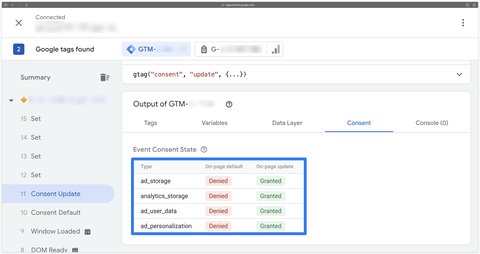
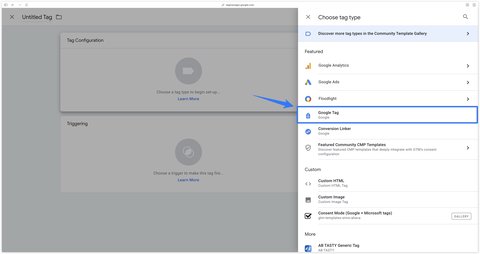
To send data to Google Ads, you need to configure a Google tag. Go to Google Tag Manager, in the Tags section click New. This Google tag centralizes the sending of information needed for Google Ads conversion tracking.
Then select Google Tag. It is the tag recommended by Google to connect your website to your Google Ads account.
In parallel, go to your Google Ads account. In Tools > Data Manager then click Manage next to your Google Tag. Then copy your Tag ID which starts with AW-. This identifier is specific to your Google Ads account.
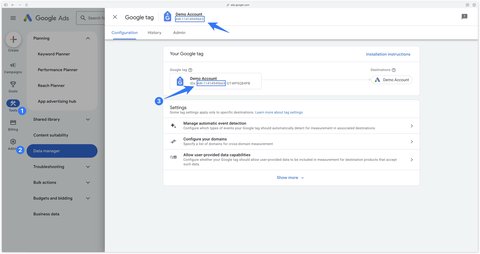
Then paste your Tag ID into the Google Tag selected earlier. Trigger this tag on Initialization - All Pages. Like the Conversion Linker, this trigger loads the tag from the very beginning of each page load.
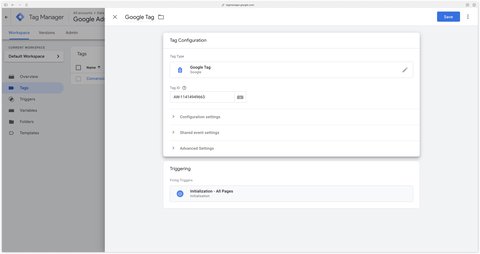
Congratulations, you have finished configuring the Google AW tag. You now have a solid base to set up Google Ads enhanced conversions with Google Tag Manager.
Once the technical prerequisites are configured, you can move on to creating your conversion action in Google Ads. This step lets you precisely define which user action should be measured on your website.
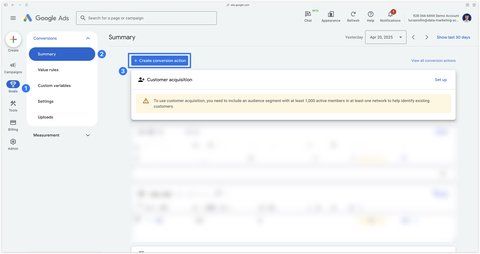
In your Google Ads account, go to Goals > Conversions > Summary then click the Create conversion action button. This step lets you create a new conversion action that will be used for Google Ads conversion tracking on your website.
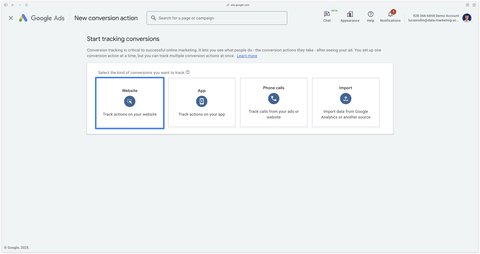
Then select Website. This choice is suitable if you want to measure conversions made directly on your site, like a purchase, a form or a contact request.
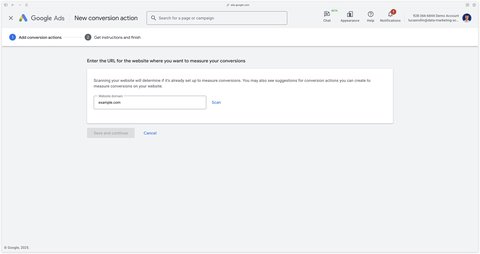
Then you can scan your website or enter the site example.com to move on to the next step. Click Scan. Google Ads will then analyze your site in order to propose a suitable configuration.
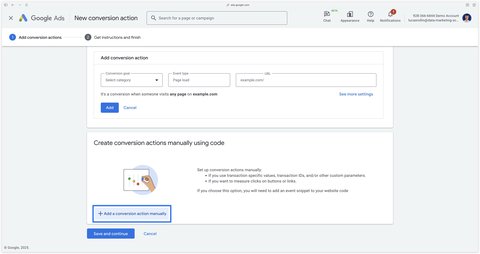
Scroll all the way down then click Add a conversion action manually. This option lets you keep full control over the configuration and set up more accurate Google Ads enhanced conversion tracking.
The rest of the tutorial will differ depending on the type of site you have:
The configuration of a conversion can indeed vary depending on your business model, the conversion value to send back and the user action you want to measure.
1) Create the purchase conversion action (Purchase)
This configuration lets you track Google Ads conversions linked to sales made on your e-commerce site and optimize your campaigns based on the value generated.
Configure your purchase conversion action in 6 steps:
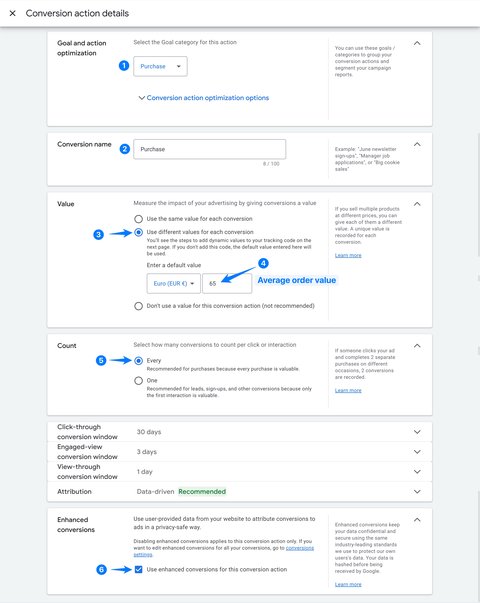
Then click Done then Save and continue.
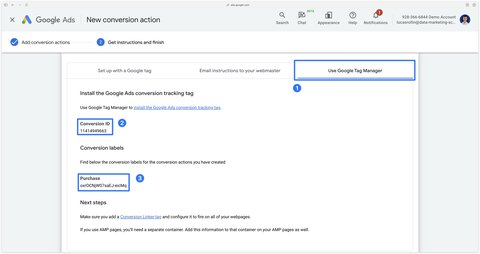
In the Use Google Tag Manager tab, two important pieces of information appear:
Save these aside as we’ll need them for the next steps. These two pieces of information will be essential to configure the tracking tag in Google Tag Manager.
Once created, your conversion action displays the Inactive status. This status is normal as long as no conversion has yet been recorded on your website.
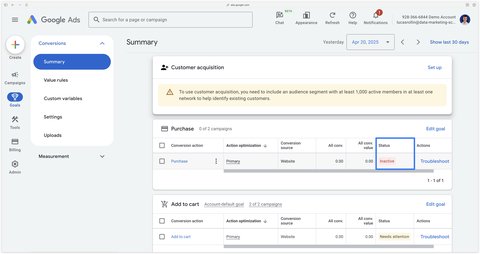
Congratulations, you have finished creating a purchase conversion action in Google Ads.
2) Configure the Purchase conversion tracking tag in Google Tag Manager
Now that your purchase conversion action is created, we will send data to it. This step links Google Tag Manager to Google Ads to trigger conversion tracking on a purchase.
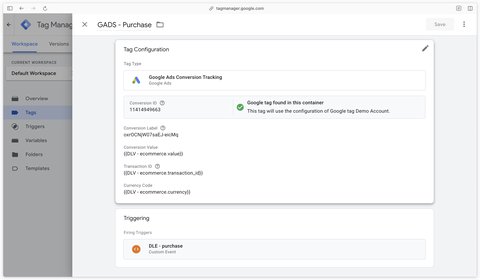
In Google Tag Manager, create a Google Ads Conversion Tracking tag. Then add your conversion ID and your conversion label (information available in your Google Ads conversion action). Make sure to fill in the right parameters to ensure reliable Google Ads conversion tracking!
The other tag fields can be filled from your dataLayer if you have set it up. A well-structured data layer allows you to dynamically pass the purchase value, the currency or the transaction ID.
1) Create the form conversion action (Submit form)
This configuration lets you track Google Ads conversions linked to contact requests, quotes or appointment bookings made on your website.
Configure your form submission conversion action in 6 steps:
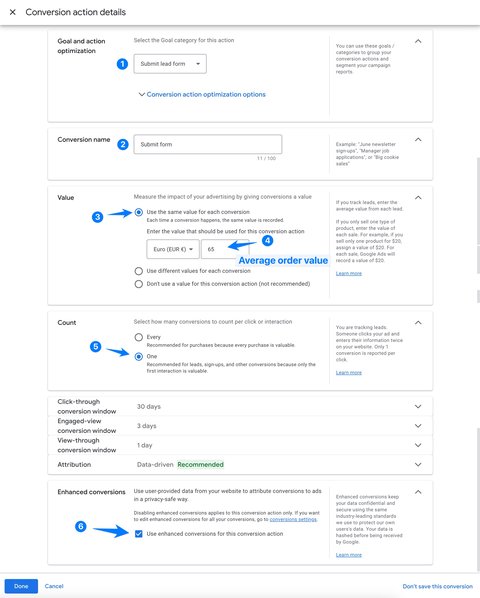
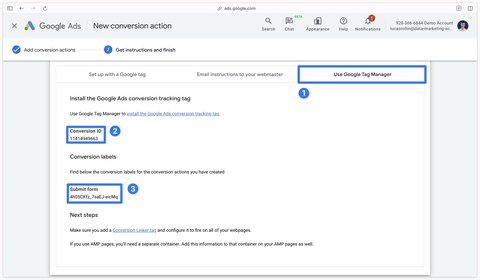
Then click Done then Save and continue.
In the Use Google Tag Manager tab, two important pieces of information appear:
Save these aside as we’ll need them for the next steps. These pieces of information will be necessary to configure your tracking tag in Google Tag Manager.
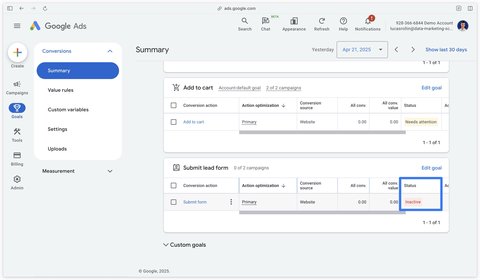
Once created, your conversion action displays the Inactive status. This status is normal as long as no valid submission has yet been recorded.
2) Configure the Submit form conversion tracking tag in Google Tag Manager
Now that your form submission conversion action is created, we will send data to it. This step triggers Google Ads conversion tracking when a user submits your form.
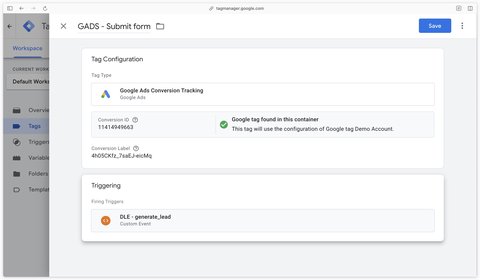
In Google Tag Manager, create a Google Ads Conversion Tracking tag. Then add your conversion ID and your conversion label (information available in your Google Ads conversion action). Make sure to use the right parameters to guarantee reliable measurement of your campaign performance.
If the value of a lead changes depending on the form used or other parameters, you can pass a dynamic value into the Conversion Value field. This lets you send a more accurate conversion value to Google Ads depending on the type of lead generated.
The trigger here is on a dataLayer generate_lead event, as I’m using a listener that sends this event to the dataLayer on each valid form submission. Using the dataLayer makes for a clean, reliable and scalable configuration in Google Tag Manager. To find out more, here’s a blog post dedicated to form tracking.
Once your conversion actions are configured, you can go further by activating Google Ads enhanced conversions. This feature lets you improve conversion measurement thanks to first-party user data collected on your website.
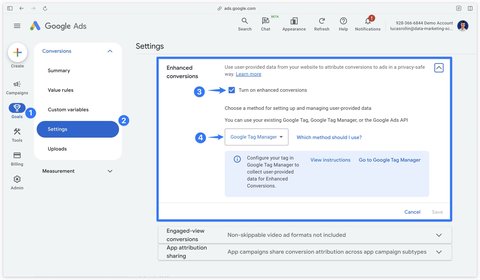
Before configuring enhanced conversions, first check that it is enabled in Google Ads and that it is managed via Google Tag Manager. This check ensures your account is ready to receive the data needed for enhanced conversions.
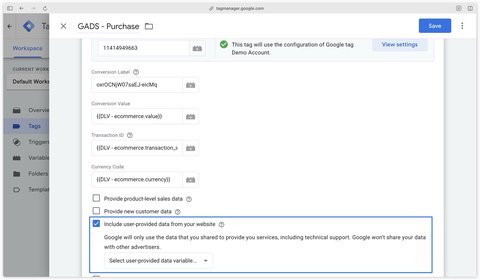
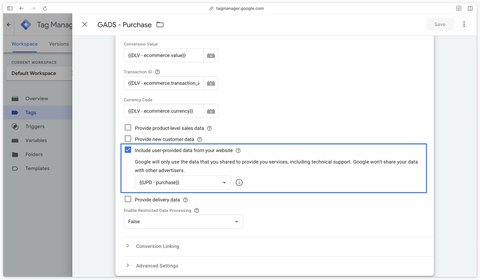
In your Google Ads conversion tag, tick the Include user-provided data from your website box. This option authorizes the secure sending of user data like email address or phone number, when these are available and collected with consent.
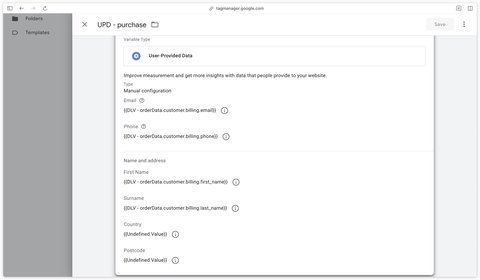
Then create a new User-Provided Data variable, select Manual Configuration as the type. This variable centralizes the user information sent to Google Ads from Google Tag Manager.
Fill this variable with all the dataLayer variables you have available. The more complete and reliable the user data entered, the better the match rate of Google Ads conversions.
Tip
If you don’t have certain variables available (in this example I don’t have Country and Postcode), you can create an Undefined Value variable instead to be able to save your User-Provided Data variable.
Finally, in your Google Ads tag, select the User-Provided Data variable you just created. Your tag will then be able to use this user data to improve conversion measurement and the performance of your Google Ads campaigns.
A question about this article, need an audit of your setup or server-side migration? Drop me a line, I reply within 24h.

Guide to install the ChatGPT Ads Measurement Pixel with GTM using my OpenAI Ads Measurement Pixel by DMS tag: GA4 events, hashed user data, deduplication

Install Microsoft Clarity with Google Tag Manager in 10 minutes: official tag, Consent V2 (Axeptio, Didomi) and Smart Events.
Track Calendly meetings and retrieve your invitee's data (email, phone, UTM, payment, form answers) with my sGTM variable
 Lucas Rollin