Title here
Summary here
Facing key advertising challenges? Take control of your tracking: audit, optimization, GDPR compliance, CMP, Consent Mode v2, and server-side tagging.
Contact LucasUpdated: Saturday, August 29, 2026
Calendly is a free tool that lets your prospects book meetings online. It competes with Cal.com or Hubspot Meetings.
When you use Calendly, you can either use a Calendly page that displays your calendar, or embed it directly on your website through an iframe.
The GTM Web part of this article (the listener that detects the booking) only works if you have embedded Calendly on your website through an iframe (Inline embed, Popup widget or Popup text).
If you send your prospects straight to a Calendly page, this part does not apply, but the GTM Server variable described below also works from Calendly webhooks (see the “What about without an iframe?” callout).
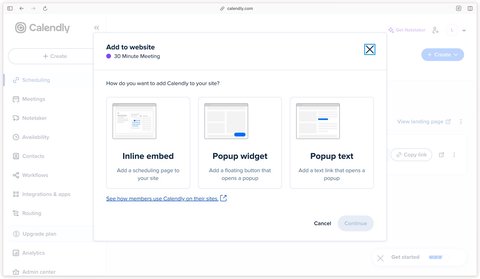
I will now show you how to track Calendly meeting bookings and how to retrieve the data of the person who booked the meeting (email address, phone number, name, but also UTM parameters, booking form answers and payment data) to send it to advertising platforms.
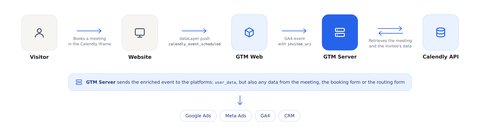
The diagram below gives an overview of the data flow that happens when a Calendly meeting is booked.
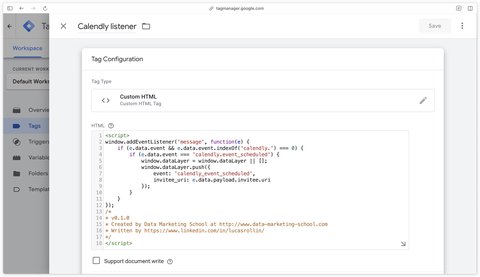
To listen to meeting bookings, you need to add this code in Google Tag Manager with a Custom HTML tag.
This is the classic listener that is easy to find online. It does not collect any user data, only the invitee URI (the person who booked a meeting). We will then use this URI in GTM Server to retrieve the information filled in by the invitee.
<script>
window.addEventListener('message', function(e) {
    if (e.data.event && e.data.event.indexOf('calendly.') === 0) {
        if (e.data.event === 'calendly.event_scheduled') {
            window.dataLayer = window.dataLayer || [];
            window.dataLayer.push({
                event: 'calendly_event_scheduled',
                invitee_uri: e.data.payload.invitee.uri
            });
        }
    }
});
/*
* v0.1.0
* Created by Data Marketing School at http://www.data-marketing-school.com
* Written by https://www.linkedin.com/in/lucasrollin/
*/
</script>
Copy the code above and paste it into a Custom HTML tag in GTM Web.
My recommendation
I recommend firing this tag only on the page(s) that contain the Calendly iframe, using the Page path to filter the pages.
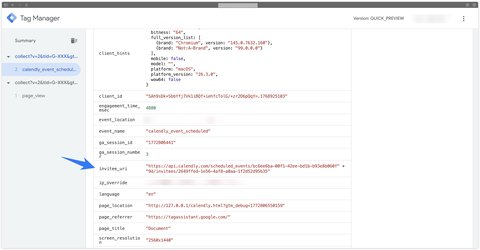
When a meeting is booked, the calendly_event_scheduled event is pushed to the dataLayer.
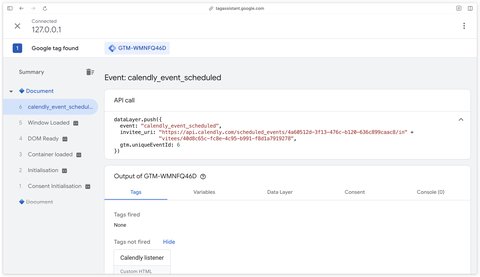
At this point, you have validated that the Calendly listener works properly and that the calendly_event_scheduled event is pushed to the dataLayer with the invitee URI.
The invitee URI always has this shape: https://api.calendly.com/scheduled_events/{event_uuid}/invitees/{invitee_uuid}. It contains both the meeting id and the invitee id, which is all the GTM Server variable needs.
The invitee URI will be used server-side to retrieve the invitee’s data.
But before that, you need to create a dataLayer variable in GTM Web to access this value.
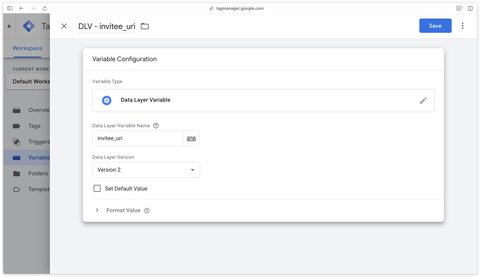
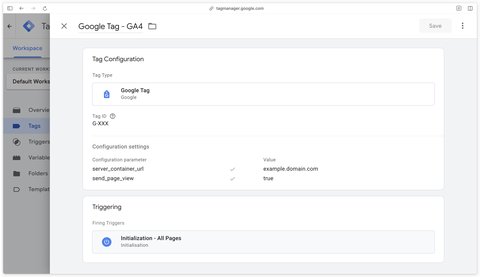
In GTM Web, create a Google tag for your GA4 stream and fill in the measurement id of your GA4 property. If you don’t have one, or don’t plan to send data to GA4, you can use G-XXX.
In Configuration settings, fill in the server_container_url and send_page_view parameters.
If you haven’t set up Google Tag Manager Server for your website tracking yet, check out my dedicated article on the topic or book a discovery call with me.
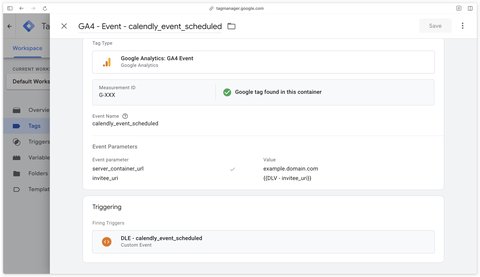
Still in GTM Web, you then need to create a GA4 event tag to send the calendly_event_scheduled event to your GTM server.
To do so, fill in the server_container_url parameter with the URL of your GTM server.
If you haven’t set up Google Tag Manager Server for your website tracking yet, check out my dedicated article on the topic or book a discovery call with me.
I developed a GTM Server variable, Enrich from Calendly API by DMS, that queries the Calendly API from the invitee URI and returns a single object gathering everything Calendly knows about the booking:
utm_source, utm_medium, utm_campaign, etc.)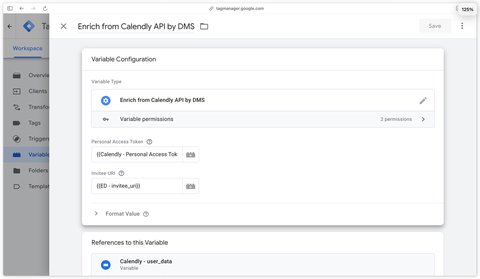
Concretely, the variable makes up to three calls to the Calendly API: one for the meeting, one for the invitee and, if the invitee went through a routing form, one for their answers. Only the invitee call is mandatory: if the others fail, the variable still returns the rest of the data and logs the reason in the preview console.
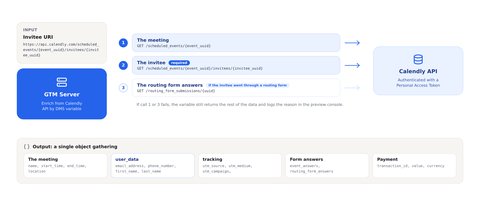
Here is the shape of the object returned by the variable (keys missing in Calendly are simply omitted):
{
    // Meeting details
    name: "30 Minute Meeting",
    start_time: "2026-08-31T07:00:00Z",
    end_time: "2026-08-31T07:30:00Z",
    location: { type: "google_conference", join_url: "https://..." },
    invitees_counter: { total: 1, active: 1, limit: 1 },
    event_created_at: "2026-08-29T15:49:46Z",
    event_updated_at: "2026-08-29T15:49:50Z",

    // Invitee
    timezone: "Europe/Paris",
    created_at: "2026-08-29T15:49:46Z",
    updated_at: "2026-08-29T15:49:46Z",
    user_data: {
        email_address: "[email protected]",
        phone_number: "+33612345678", // if available
        address: {
            first_name: "John",
            last_name: "Doe"
        }
    },

    // UTM parameters passed to Calendly (if present)
    tracking: {
        utm_source: "newsletter",
        utm_medium: "email",
        utm_campaign: "webinar"
    },

    // Booking form answers
    event_questions: ["How did you hear about us?"],
    event_answers: ["A newsletter"],
    event_answers_by_question: { "How did you hear about us?": "A newsletter" },

    // Routing form answers (if the invitee went through a routing form)
    routing_form_questions: ["What is your budget?"],
    routing_form_answers: ["50k"],
    routing_form_answers_by_question: { "What is your budget?": "50k" },

    // Paid meetings only
    transaction_id: "ch_3Q7xKjL2eZvKYlo2",
    value: 150,
    currency: "EUR",
    payment_successful: true,
    payment: { provider: "stripe", amount: 150, currency: "EUR", ... }
}
A few details about how the user data is formatted:
transaction_id, value and currency are lifted to the top level so they can be used directly in a conversion tagWhat about without an iframe?
The variable also works from Calendly webhooks. If you receive the invitee.created or invitee.canceled notifications in a client of your server container, the webhook’s payload.uri value is exactly the URI expected by the Invitee URI field. The rest of the setup is identical.
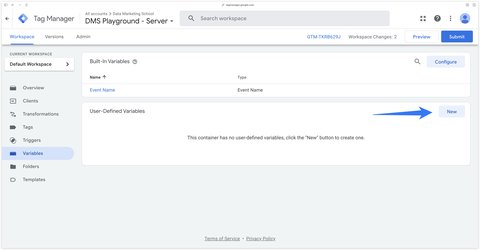
Go to the Variables section of GTM Server and click New.
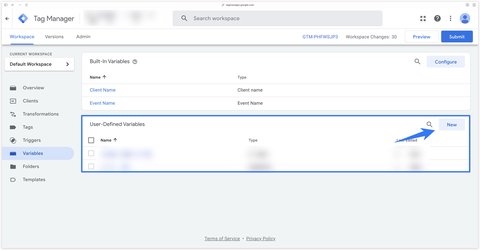
Then click the blue banner at the top to open the variable template gallery.
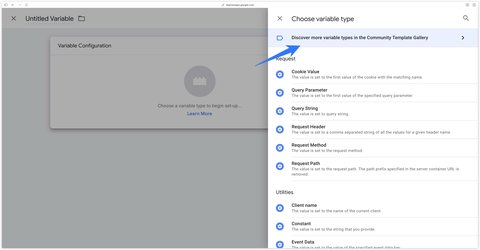
Search for Calendly and click the Enrich from Calendly API by DMS template by Data Marketing School.
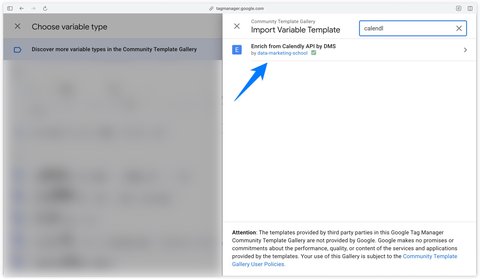
Then click Add to workspace to import the template into your GTM Server container.
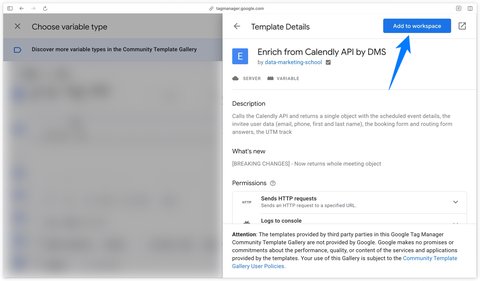
Go to the Variables section of GTM Server and click New to create a new variable.
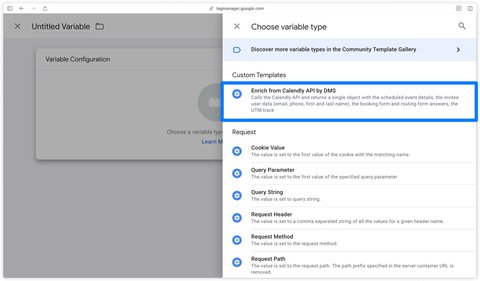
Select the Enrich from Calendly API by DMS variable you just imported.
Once the variable is selected, you can see that there are 2 fields to fill in:
invitee_uri parameter sent by GTM Web.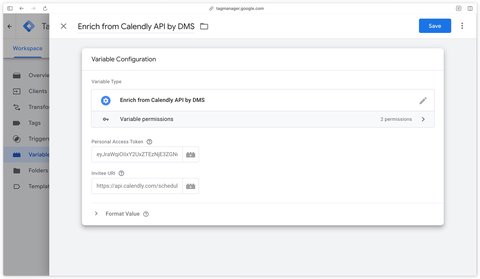
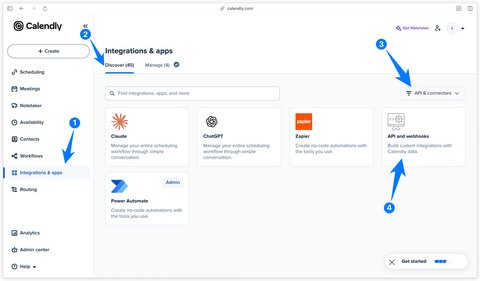
In your Calendly account, go to the Integrations & apps section and click API and webhooks.
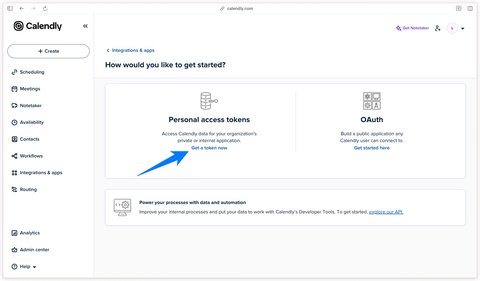
Then click Generate New Token in the Personal Access Token section.
When creating the token, Calendly asks you to choose the token’s scopes (permissions). Two scopes are useful for this variable:
scheduled_events:read: required, it allows reading the meeting and the inviteerouting_forms:read: optional, it allows reading the routing form answers. Without this scope, the variable still returns all the other data and simply reports the routing form error in the preview console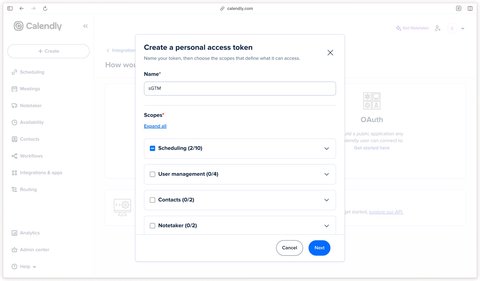
Several hosts in your Calendly organization?
A token created by a regular member only reads that member’s own meetings. If you want to enrich bookings from several hosts (several sales reps, for instance), create the token with an admin or owner account of the organization. Otherwise some invitees will return a 403 error and others won’t, which is quite confusing to debug.
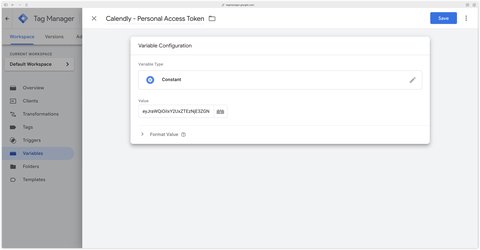
Then copy the generated token.
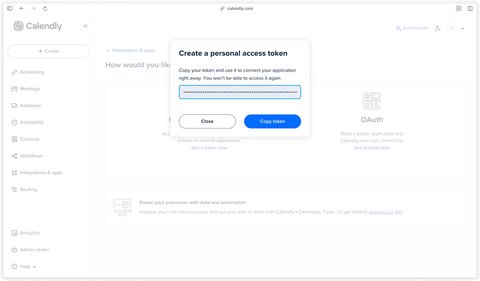
Then create a Constant variable to store this token in GTM Server.
Next, you need to create an Event data variable to retrieve the invitee URI pushed to the dataLayer by GTM Web when a meeting is booked.
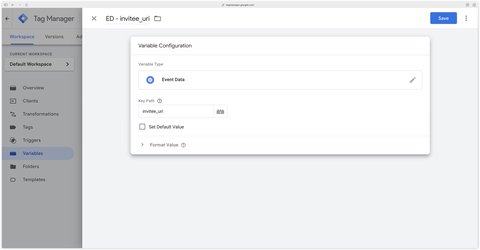
You now have everything you need to configure the Calendly variable in GTM Server. All that’s left is to fill in the Personal Access Token field with the Constant variable you created to store the token, and the Invitee URI field with the Event data variable you just created.
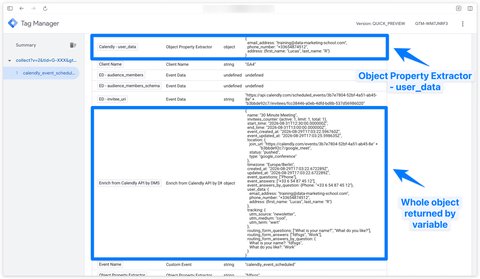
The Calendly variable returns a complete object, but Google Ads, Meta or GA4 tags only expect the user_data object in the event’s user_data parameter. You therefore need to extract this property before injecting it into the event.
To do so, import the Object Property Extractor variable template from the GTM Server variable template gallery, the same way you did for the Calendly variable.
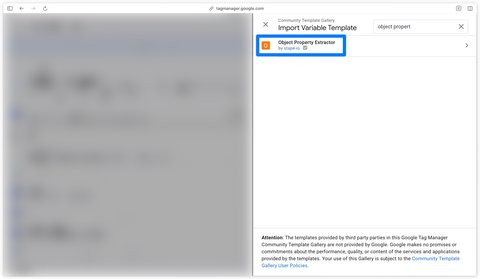
Then create a variable from this template. It has 2 fields:
user_dataThe Property field accepts dot notation to reach a nested property, for instance user_data.email_address if you only want the email address.
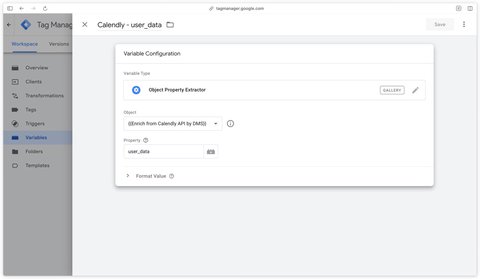
This variable only returns the user_data part of the Calendly object:
{
    email_address: "[email protected]",
    phone_number: "+33612345678", // if available
    address: {
        first_name: "John",
        last_name: "Doe"
    }
}
Not only user_data
This method works for any property of the Calendly object. Create as many Object Property Extractor variables as you need by simply changing the Property field: tracking for the UTM parameters, event_answers_by_question for the form answers, value for the amount of a paid meeting, start_time for the meeting date, etc.
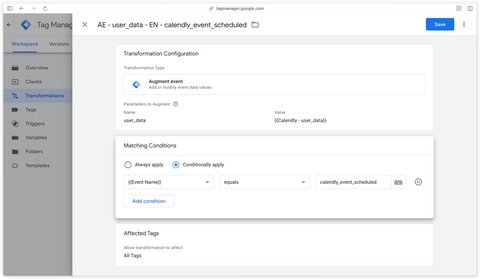
The last configuration step consists in adding the Calendly data to the GA4 calendly_event_scheduled event when it is received in GTM Server. I’m using the user_data parameter as an example here, which will contain the invitee’s user data extracted with the Object Property Extractor variable you just created. But this is only an example: you can add any other data from the Calendly object the same way (UTM parameters, booking form or routing form answers, meeting amount, etc.), each with its own Object Property Extractor variable.
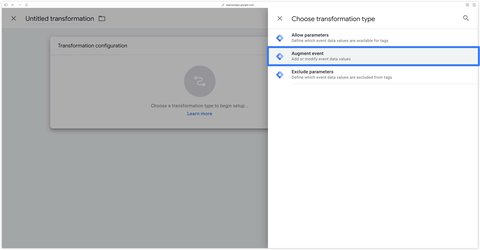
This is done by creating a Transformation of type Augment event.
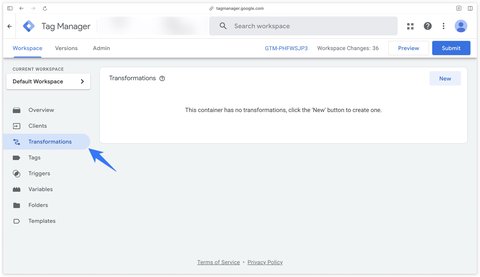
In GTM Server, go to the Transformations section and click New to create a new transformation.
Then add a transformation of type Augment event.
Then configure the transformation so that it applies when the calendly_event_scheduled event is received. In the Parameters to augment section, add a new user_data field and set its value to the Object Property Extractor variable you configured earlier. Add as many fields as there are Calendly data you want to pass to your tags, one per Object Property Extractor variable.
In the GTM Web preview, you can check two things:
calendly_event_scheduled event is pushed to the dataLayer when a Calendly meeting is bookedcalendly_event_scheduled event is sent to the GTM server by the GA4 - Event - calendly_event_scheduled event tag you configured earlier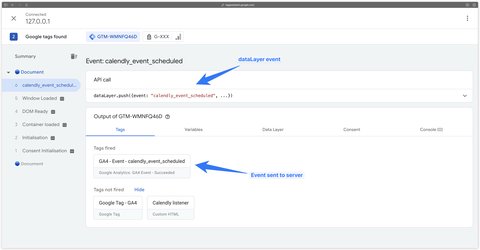
In the GTM Server preview, you can check that the calendly_event_scheduled event is received and that it contains the invitee_uri parameter.
In the Variables tab, also check that your Calendly variable is populated with the complete object (meeting details, user_data, tracking, form answers) and that the Object Property Extractor variable only contains the user_data part.
If the Calendly variable is undefined, open the Console tab of the preview: the variable logs the reason for the failure there. The most common cases are:
invitee_uri parameter does not have the shape https://api.calendly.com/scheduled_events/{event_uuid}/invitees/{invitee_uuid}. Check the Event data variable and the GTM Web listener.scheduled_events:read scope, or it was created by a member who is not the host of this meeting (see the callout about the admin role above).All the tags (Meta, Google Ads, etc.) you fire when the calendly_event_scheduled event is received in GTM Server can now access the invitee’s user data through the user_data parameter we added in the Augment Event transformation.
You have now set up Calendly meeting tracking with Google Tag Manager Web and Server. You can now track meeting bookings and send your invitees’ user data to advertising platforms, and even use the UTM parameters, the form answers or the amount of paid meetings to go further.
A question about this article, need an audit of your setup or server-side migration? Drop me a line, I reply within 24h.

How to accurately track Cal.com appointments with Google Tag Manager

Hubspot lets you to integrate a meeting scheduler on your website through an iframe. Here is how to trigger an event when a new meeting is booked.

Guide to install the ChatGPT Ads Measurement Pixel with GTM using my OpenAI Ads Measurement Pixel by DMS tag: GA4 events, hashed user data, deduplication
 Lucas Rollin