Title here
Summary here
Facing key advertising challenges? Take control of your tracking: audit, optimization, GDPR compliance, CMP, Consent Mode v2, and server-side tagging.
Contact LucasUpdated: Tuesday, June 23, 2026
The dataLayer (or data layer) is a storage space in the browser that attaches to your website in order to expose data and/or user behaviors to a Tag Management System such as Google Tag Manager.
In practice, the Data Layer is a JavaScript object that centralizes the information useful for tracking and web analytics. This data layer acts as an intermediary between your website and tools such as Google Tag Manager (GTM), Google Analytics or other analytics platforms.
The main advantage of the Data Layer is that you can store data that is not necessarily available on the web page but is still valuable to collect.
Thanks to this structure, you can set up more reliable tracking of user interactions, events, clicks, forms or e-commerce purchases. The information stored in the data layer can also be used to populate custom dimensions or trigger certain tags.
The Tag Management tool you use will then be able to read this Data Layer and use the information it contains in its tags, variables and triggers.
The Data Layer is therefore an essential part of modern tag management. It separates the data from the page’s HTML code and makes it easier to set up cleaner, more robust data collection that is better suited to the client’s needs. This method is now widely used with Google Tag, Google Tag Manager and the various web analytics tools.
In short: Concretely, a Data Layer is an object containing values organized as variables and events. Each piece of information has a name and a value that can then be used by GTM to fire tags at the right moment and ensure accurate tracking of user interactions on the site.
There are several ways to set up a data layer on a website. Depending on your needs, the configuration can be done using plugins or manually in JavaScript. Let’s go over it together!
Depending on the platform you use, some plugins let you set up a data layer without complex development. This solution is particularly useful for e-commerce sites or for companies that want to speed up their configuration.
On the CMS plugin marketplaces, you’ll find plugins that handle the Data Layer implementation for you.
Good to know: some plugins automatically generate a Data Layer, but the data structure varies from one CMS to another. It is therefore recommended to check that the information sent matches your tracking needs!
For more advanced needs, you can configure the Data Layer manually. This method offers more flexibility and lets you structure the data based on the type of website and the information you want to collect.
The Data Layer is a JavaScript object that must be declared before the Google Tag Manager container loads. This step is essential so that the variables and events are correctly used by the tags and triggers.
Since the goal is to expose data to Google Tag Manager, the Data Layer must be declared before the Google Tag Manager code.
Remember to replace GTM-XXXXXXX with your container ID.
<head>

	<script>
		// If a Data Layer already exists we keep its content, otherwise we create an empty JavaScript array.
		window.dataLayer = window.dataLayer || [];
	</script>

	<!-- Google Tag Manager -->
	<script>(function(w,d,s,l,i){w[l]=w[l]||[];w[l].push({'gtm.start':
	new Date().getTime(),event:'gtm.js'});var f=d.getElementsByTagName(s)[0],
	j=d.createElement(s),dl=l!='dataLayer'?'&l='+l:'';j.async=true;j.src=
	'https://www.googletagmanager.com/gtm.js?id='+i+dl;f.parentNode.insertBefore(j,f);
	})(window,document,'script','dataLayer','GTM-XXXXXXX');</script>
	<!-- End Google Tag Manager -->

</head>
Once the data layer is created, you can store various information related to the page viewed, a product or the user. This approach makes data collection easier and improves the quality of tracking on the site.
Right after setting it up, you can already send data to the Data Layer — for example to pass metadata about the current page.
Remember to replace GTM-XXXXXXX with your container ID.
<head>

	<script>
		// If a Data Layer already exists we keep its content, otherwise we create an empty JavaScript array.
		window.dataLayer = window.dataLayer || [];
		dataLayer.push({
		    pageCategory: "Cosmetics", // category of the page visited
		    user_id: 1231654 // user identifier
		});
	</script>

	<!-- Google Tag Manager -->
	<script>(function(w,d,s,l,i){w[l]=w[l]||[];w[l].push({'gtm.start':
	new Date().getTime(),event:'gtm.js'});var f=d.getElementsByTagName(s)[0],
	j=d.createElement(s),dl=l!='dataLayer'?'&l='+l:'';j.async=true;j.src=
	'https://www.googletagmanager.com/gtm.js?id='+i+dl;f.parentNode.insertBefore(j,f);
	})(window,document,'script','dataLayer','GTM-XXXXXXX');</script>
	<!-- End Google Tag Manager -->

<head>
Each piece of data is associated with a name and a value. You can therefore easily add custom information to the Data Layer based on your website’s needs.
The Data Layer is not only used to store static data. It also lets you track user interactions and send events when a specific action is performed. This use is especially important for tracking clicks, forms or e-commerce journeys.
If we take a basic example of a button meant to submit a form, we can trigger an event in the Data Layer as soon as the user clicks the “Submit the form” button.
<body>

	<button id="btn">Submit the form</button>

	<script>
		var btn = document.querySelector("#btn");
		btn.addEventListener("click", function() {
			// we send an event to the Data Layer
			dataLayer.push({ event: "submit_form" });
		});
	</script>

</body>
If you’d like to delegate the setup of your Data Layer, the configuration of Google Tag Manager or the optimization of your tracking, I can support you as a freelancer to set up reliable data collection tailored to your needs. to tell me about your project!
When configuring manually, it’s important to respect the order in which data and events are sent to the Data Layer. This best practice ensures more reliable tracking and avoids certain tracking issues.
Data (any information that does not contain the event key) must be sent to the Data Layer before Google Tag Manager loads, in the <head> tag.
All events must be sent AFTER the Google Tag Manager code, before the </body> tag.
Here is the final result:
Remember to replace GTM-XXXXXXX with your container ID.
<!DOCTYPE html>
<html lang="en">
<head>
    <meta charset="UTF-8">
    <meta name="viewport" content="width=device-width, initial-scale=1.0">
    <title>Document</title>
    <script>
            // If a Data Layer already exists we keep its content, otherwise we create an empty JavaScript array.
            window.dataLayer = window.dataLayer || [];
            dataLayer.push({
                pageCategory: "Cosmetics", // category of the page visited
                user_id: 1231654 // user identifier
            });
    </script>

    <!-- Google Tag Manager -->
    <script>(function(w,d,s,l,i){w[l]=w[l]||[];w[l].push({'gtm.start':
    new Date().getTime(),event:'gtm.js'});var f=d.getElementsByTagName(s)[0],
    j=d.createElement(s),dl=l!='dataLayer'?'&l='+l:'';j.async=true;j.src=
    'https://www.googletagmanager.com/gtm.js?id='+i+dl;f.parentNode.insertBefore(j,f);
    })(window,document,'script','dataLayer','GTM-XXXXXXX');</script>
    <!-- End Google Tag Manager -->
</head>
<body>
    <button id="btn">Submit the form</button>
    <script>
        var btn = document.querySelector("#btn");
        btn.addEventListener("click", function() {
            // we send an event to the Data Layer
            dataLayer.push({ event: "submit_form" });
        });
    </script>
</body>
</html>Several methods let you display the Data Layer content to check the available data and make tracking analysis or debugging easier.
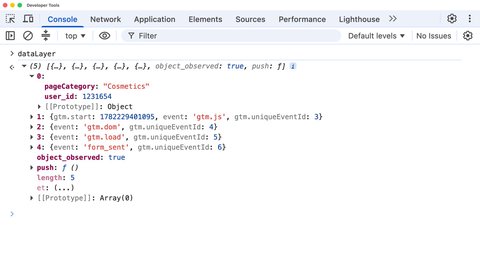
The browser console is one of the simplest methods to inspect the data layer and check the information sent from your website.
If you type dataLayer in your browser console, you can access its content.
You’ll be able to view the variables, their associated values and the various events present in the Data Layer. This method is particularly useful for checking the information passed when the page loads.
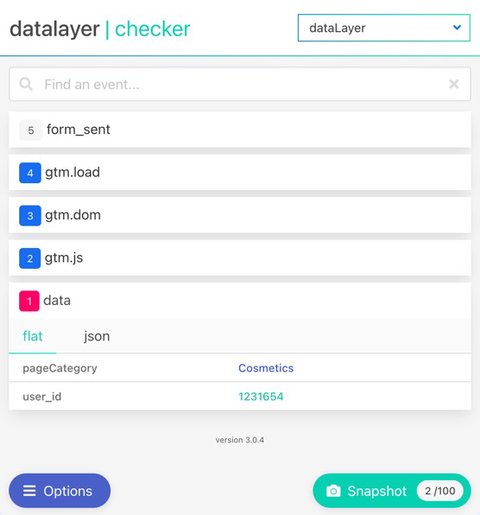
There are also several tools that make it easier to view the structure of the Data Layer without using the browser console.
You can also use one of the following extensions to view the Data Layer content:
These extensions are particularly useful for analyzing the data present in the data layer and checking that the expected information is correctly sent.
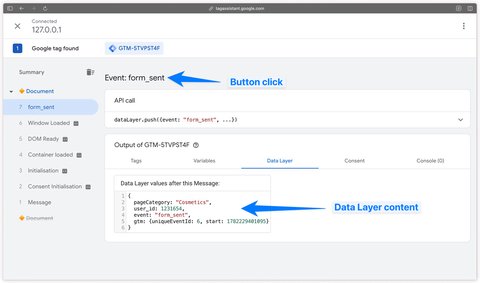
Google Tag Manager’s Preview mode lets you check that the Data Layer works correctly and analyze the events triggered on a page.
Debugging is an important step to make sure the data is correctly sent and that your tracking works as expected.
In Google Tag Manager’s debug mode, there is a Data Layer tab that lets you view its content based on the events occurring on the page.
You can then review the information available after each event and check that the expected values are indeed present in the data layer. This method makes it easier to analyze tracking and resolve any configuration issues.
The Data Layer is an essential element to structure data and set up reliable tracking with Google Tag Manager. Well designed, it makes it easier to collect information, track events and analyze user interactions on a website.
Whether for a simple project or a more advanced implementation, taking the time to define a clear structure for your Data Layer will give you more reliable data and let you make the most of your analytics tools.
A question about this article, need an audit of your setup or server-side migration? Drop me a line, I reply within 24h.

Guide to install the ChatGPT Ads Measurement Pixel with GTM using my OpenAI Ads Measurement Pixel by DMS tag: GA4 events, hashed user data, deduplication

Install Microsoft Clarity with Google Tag Manager in 10 minutes: official tag, Consent V2 (Axeptio, Didomi) and Smart Events.

Track Calendly meetings and retrieve your invitee's data (email, phone, UTM, payment, form answers) with my sGTM variable
 Lucas Rollin