Title here
Summary here
Facing key advertising challenges? Take control of your tracking: audit, optimization, GDPR compliance, CMP, Consent Mode v2, and server-side tagging.
Contact LucasUpdated: Monday, May 18, 2026
Google Analytics 4 tells you how many users visit a page, how many convert and where they come from. That’s valuable, but those numbers never answer the real question: why are your visitors behaving like that? Why do 80% of visitors leave your product page without clicking “Add to cart”? Why does your quote form show a 65% drop-off rate? GA4 won’t tell you.
That’s precisely what Microsoft Clarity is for: a free behavioral analytics tool that records sessions, generates heatmaps and automatically surfaces friction points on your website. Paired with Google Tag Manager, deployment takes ten minutes and slots in cleanly with your existing tracking stack.
In this guide, you’ll learn how to:
Not convinced yet? You can explore a public Microsoft Clarity demo that gives you access to a real project with heatmaps, recordings and Smart Events, without installing anything.
Microsoft Clarity is a free behavioral analytics tool developed by Microsoft, publicly available since late 2020. Its goal is simple: show you how your visitors actually interact with your site, whereas Google Analytics 4 only tells you how many they are and what they look at.
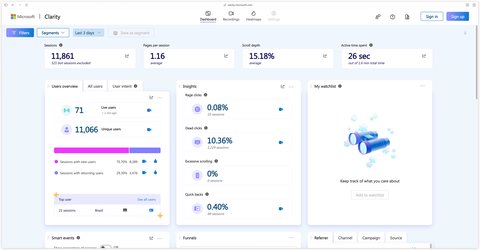
In concrete terms, Clarity gives you access to four families of features.
Clarity is 100% free, with no traffic limit, no recorded sessions limit and no user limit on the account. Microsoft also offers a native integration with Google Analytics 4 that lets you filter Clarity recordings directly from a GA4 dimension, and vice versa.
To fully grasp the value of Microsoft Clarity, you need to clarify a fundamental distinction in the analytics world: the difference between quantitative data and qualitative data.
Quantitative data answers the questions “how many”, “what” and “where”. How many sessions yesterday? What’s the conversion rate on the cart page? Where do your visitors come from (acquisition channel, country, device)? Which pages generate the most revenue? That’s exactly what Google Analytics 4 measures: aggregated metrics, expressed as numbers, that describe what happened on your site.
Qualitative data, on the other hand, answers the questions “why” and “how”. Why do visitors abandon this form at step 2? How do they scroll on this landing page? Which buttons attract their attention and which ones are totally ignored? This data can’t be summed up by a single figure: it’s observed through video recordings, heatmaps and journey replays. That’s the playground of Microsoft Clarity, and more broadly of session analytics tools (Hotjar, FullStory, Mouseflow, Smartlook).
The two approaches are complementary, never interchangeable. GA4 alerts you that your checkout funnel shows an unusual drop-off between the “shipping info” and “payment” steps. Clarity then shows you, by replaying ten abandoned sessions, that your users are desperately trying to click on a field that doesn’t react on mobile, or that they get stuck on a confusing error message.
It’s this loop “GA4 detects the problem → Clarity reveals the cause → you fix it → GA4 measures the impact” that gives the whole conversion rate optimization (CRO) practice its value.
Before touching Google Tag Manager, you need to create a Clarity project and grab its project ID, the unique identifier that links your website to your Clarity account.
Head to https://clarity.microsoft.com and sign in with your Microsoft, Google or Facebook account, or with a dedicated email address. Account creation is instant and requires no payment information.
Once logged in, click New project. Fill in the project name, the URL of your website, and pick the category that best matches your business (e-commerce, blog, SaaS, etc.).
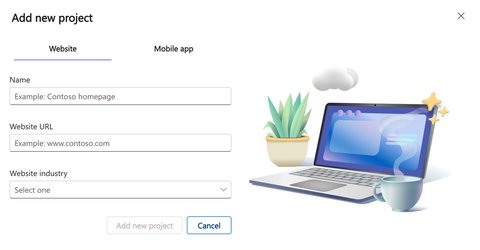
Best practices for managing Clarity projects
You can create multiple projects under a single Clarity account. A good practice is to create one project per website to keep your data siloed.
Once the project is created, you land on the dashboard. To get the project ID, go to Settings > Overview: the project ID is displayed under the project name. In this example, the string wszl6h7j2r is our project ID. That’s the value you’ll paste into Google Tag Manager in the next step.
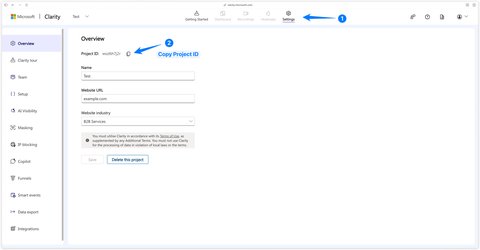
You can also retrieve this identifier by going to Settings > Setup > Get tracking code, where it appears in the JavaScript snippet provided by Clarity.
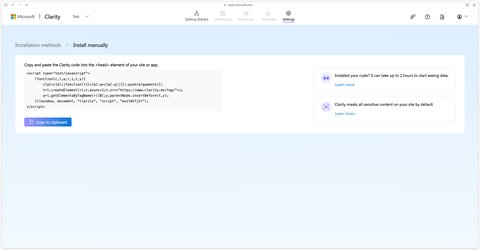
Several methods exist to install Clarity with Google Tag Manager: the automatic integration from the Clarity interface, the manual install via a Custom HTML tag, or the use of the official “Microsoft Clarity - Official” tag template available in the GTM community gallery.
We recommend this last method. Why? Because an official tag template is sandboxed, vetted by Google, and avoids injecting raw JavaScript into your container (a classic source of errors and security flaws). The template is maintained directly by Microsoft on its official GitHub repository, which guarantees its long-term maintenance.
Log into your Google Tag Manager container. Go to Tags > New.
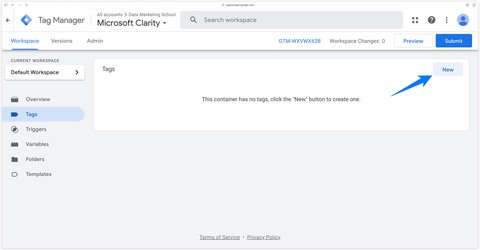
Give it a clear name, for example Microsoft Clarity - Base Tag. Consistent naming is essential for the long-term maintenance of your container.
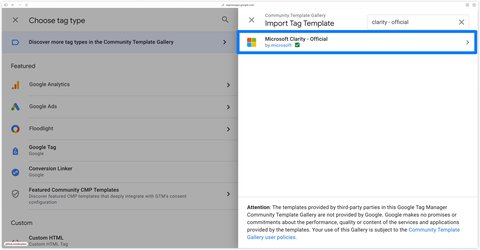
Click on Tag Configuration, then on Discover more tag types in the Community Template Gallery.
In the search bar, type Clarity, then pick the option Microsoft Clarity - Official.
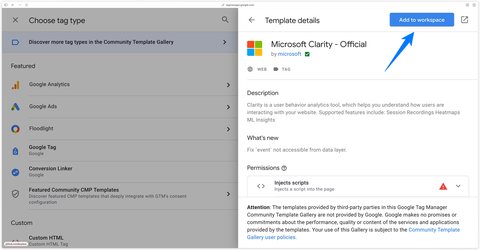
Click Add to workspace, then confirm adding the template to your container.
Once the template is added, you arrive on the tag configuration page. The only required field is Clarity Project ID. Paste the value you grabbed in the previous step. In this example, it’s wszl6h7j2r.
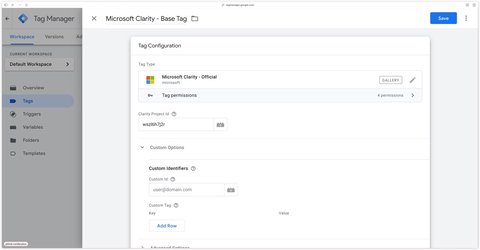
The official template also exposes several advanced options in a Custom options section:
You can leave these options empty for a first deployment and come back to them later.
Note that you must fill in the Custom ID field for the other fields to appear.
Custom Tags are particularly powerful in practice. A few concrete use cases you’ll probably want to set up within your first few weeks:
ab_test_variant=B to filter sessions by the variant of an ongoing A/B test and visually compare journeys.plan=premium or plan=free to see how paying users behave differently from free users on your SaaS.funnel_step=checkout_step_3 to isolate sessions stuck at a specific step of your funnel and understand why.user_role=admin to exclude (via a Clarity filter) your team’s internal sessions during analysis.To pass a Custom Tag, wire the Value field to a GTM variable that dynamically returns the value (a data layer variable, a cookie variable or a custom JavaScript variable).
Click on the Triggering section and select Initialization - All Pages. The Clarity code needs to load across your entire site to capture every session.
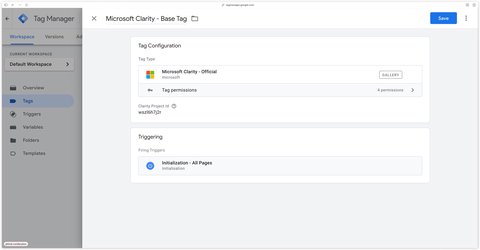
Click Save, then Submit at the top right of your container to publish your changes. A few minutes after publishing, you should start seeing the first sessions show up in your Clarity dashboard.
Since October 31, 2025, Microsoft Clarity enforces a valid consent signal for every visit originating from the European Economic Area, the United Kingdom and Switzerland. Without a consent signal, Clarity falls back to a degraded mode (no-consent mode) and sets no cookies, which breaks cross-session tracking: each page view is then counted as a distinct unique user, and you lose most of the analytical value of the tool.
That’s where the Consent V2 API comes in: the official, Microsoft-recommended way to forward the user’s cookie decision to Clarity. It replaces the older Consent V1 API, which is scheduled for deprecation.
If you need help deploying Microsoft Clarity, I can also help out as a Google Tag Manager freelancer: audit/diagnosis of your current tracking, GTM implementation of Clarity, consent setup (CMP + Consent Mode v2) tied to Clarity’s consentv2, and ongoing monitoring/optimization to keep your tracking clean as the site evolves. Feel free to book a discovery call to discuss it!
The Consent V2 API exposes a global JavaScript function window.clarity('consentv2', ...) that takes two parameters:
ad_Storage: consent for storing ad-related data (values: "granted" or "denied")analytics_Storage: consent for storing analytics-related data (values: "granted" or "denied")Here are the four possible combinations, to call after the user has made their decision:
// Full consent granted
window.clarity('consentv2', {
  ad_Storage: "granted",
  analytics_Storage: "granted"
});

// Analytics denied only
window.clarity('consentv2', {
  ad_Storage: "granted",
  analytics_Storage: "denied"
});

// Ad denied only
window.clarity('consentv2', {
  ad_Storage: "denied",
  analytics_Storage: "granted"
});

// Full denial
window.clarity('consentv2', {
  ad_Storage: "denied",
  analytics_Storage: "denied"
});
You’ll notice the consistency with Google’s Consent Mode V2: the signal names (ad_Storage, analytics_Storage) are identical. This is intentional on Microsoft’s part, and it makes the integration with your existing CMP (Consent Management Platform) much easier.
The approach we recommend is to use the community template Microsoft Clarity Events by Markus Baersch — the same one we cover in step 4 for Smart Events. On top of sending API events, this template natively exposes a Set consent checkbox that calls window.clarity('consentv2', ...) for you, without any JavaScript to write or custom HTML tag to maintain.
The tricky part is that there is no single setup: everything depends on the CMP you use. Each CMP emits its own events in the dataLayer when the user changes consent, exposes its own mechanism to know whether a given vendor was accepted, and uses its own identifiers for Microsoft Clarity. You’ll therefore need to adapt three elements to your CMP:
axeptio_update_consent for Axeptio, didomi-consent-changed for Didomi, etc.).Mandatory prerequisite
Microsoft Clarity must be added as a vendor in your CMP’s interface. Without this declaration, the vendor will never be present in the list of granted consents, and your GTM variable will always return denied. Refer to your CMP’s documentation to add Microsoft Clarity to your vendor declaration.
Below are two concrete implementations, one with Axeptio and one with Didomi. Adapt them to your CMP by following the same logic.
1. Declare Clarity as a vendor in Axeptio
In your Axeptio project, add Microsoft Clarity to your vendor list. Note the internal identifier assigned by Axeptio (here clarity) — it’s the one you’ll look up in the cookie on the GTM side.
2. Create a custom JavaScript variable in GTM
Axeptio writes in the axeptio_authorized_vendors cookie the list of vendors the user has granted consent for, separated by commas. In GTM, create a custom JavaScript variable named for instance CJS - Axeptio - Clarity Consent:
function() {
  var match = document.cookie.match(/(?:^|; )axeptio_authorized_vendors=([^;]*)/);
  if (!match) return 'denied';
  var vendors = decodeURIComponent(match[1]);
  return vendors.indexOf('clarity') !== -1 ? 'granted' : 'denied';
}
This variable returns "granted" if the clarity identifier is present in the list, "denied" otherwise.
3. Set up a trigger on the Axeptio event
Create a custom event trigger in GTM, listening for the axeptio_update_consent event that Axeptio pushes to the dataLayer on every consent update.
4. Configure the Microsoft Clarity Events tag
In a tag based on the Microsoft Clarity Events template:
CJS - Axeptio - Clarity Consent variable.axeptio_update_consent custom event created in step 3.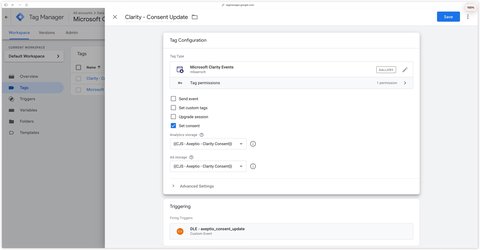
1. Declare Microsoft Clarity as a vendor in Didomi
In the Didomi console, add Microsoft Clarity to your vendor list (Data Manager > Vendors). Note the exact identifier assigned by Didomi (for example microsoft-tZVFUA2Y).
2. Activate the didomiVendorsEnabled dataLayer variable
Didomi pushes a didomiVendorsEnabled variable to the dataLayer containing the list of accepted vendors (a comma-separated string or an array depending on your setup). In GTM, create a data layer variable named for instance DLV - didomiVendorsEnabled with didomiVendorsEnabled as the variable name.
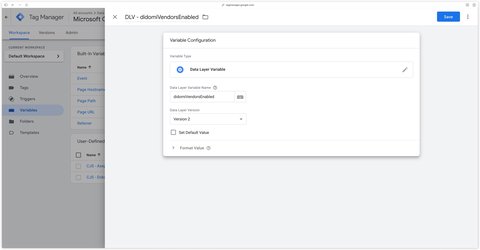
3. Create a custom JavaScript variable
Then create a custom JavaScript variable CJS - Didomi - Clarity Consent that leverages the DLV created above:
function() {
  var vendorName = 'microsoft-tZVFUA2Y';
  var vendors = {{DLV - didomiVendorsEnabled}};
  if (!vendors) return 'denied';
  var list = Array.isArray(vendors) ? vendors.join(',') : String(vendors);
  return list.indexOf(vendorName) !== -1 ? 'granted' : 'denied';
}
Adapt the 'microsoft-tZVFUA2Y' string to the exact identifier noted in step 1.
4. Set up a trigger on the Didomi event
Create a custom event trigger listening for the didomi-consent-changed event that Didomi pushes on every consent update.
5. Configure the Microsoft Clarity Events tag
In a tag based on the Microsoft Clarity Events template:
CJS - Didomi - Clarity Consent variable.didomi-consent-changed custom event created in the previous step.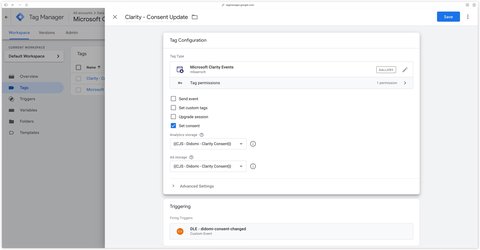
To validate your implementation, open your browser console on a page of your site, accept the cookies in your CMP banner, then run:
document.cookieYou should see the Clarity cookies (_clck, _clsk) appear if consent was indeed granted. Conversely, after withdrawing consent, these two cookies should not appear.
Smart Events are one of Microsoft Clarity’s most powerful features, yet often overlooked by beginners. Their promise: automatically identify the key actions on your site (purchase, add to cart, sign-up, contact, download…) without configuring a single GTM tag or writing a single line of code.
Clarity combines several signals (button clicks, page navigation, form submissions) to reconstruct high-level events, similar to the ones you’d set up in GA4. The tool automatically detects nine event types:
In concrete terms, as soon as you install Clarity on your site, the tool starts learning. After a few days, it suggests in the dashboard a list of auto-detected Smart Events that you can activate with a single click.
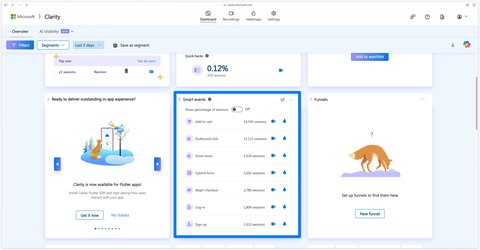
You can also build your own Smart Events from scratch, still without code. Go to Settings > Smart events > New event.
Even though creating a Smart Event is easy from the Clarity UI, the method we recommend is to use a Google Tag Manager tag. Why? Because it lets you leverage the full power of GTM to precisely define the firing conditions of your event (combinations of clicks, page views, custom variables, etc.), and gives you better traceability inside your GTM container.
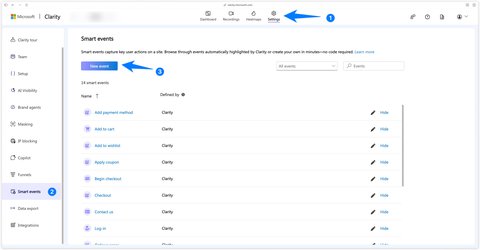
You have the choice between four signal categories:
/thank-you after a form).window.clarity('event', 'event_name')), for advanced cases.You can combine multiple signals within a single Smart Event to group different equivalent actions. For instance, a “Sign Up” event can aggregate a click on the “Create an account” button at the top of the page and a visit on the /welcome URL after sign-up.
Only project admins can create or edit Smart Events. You’re limited to 20 custom Smart Events per project, which is plenty for most needs.
Microsoft does not (as of this writing) provide an official template for sending API events to Clarity from Google Tag Manager. It’s Markus Baersch who maintains the de-facto community template: Microsoft Clarity Events, available in the GTM gallery and open source on GitHub.
This template lets you, from a single tag, send a Clarity event, set custom tags on the session, force the recording of a priority session and even update consent — without writing a single line of JavaScript.
In your Google Tag Manager container, create a new tag, open the community gallery (Discover more tag types) and search for Microsoft Clarity Events. Make sure the displayed author is mbaersch, then add the template to your workspace.
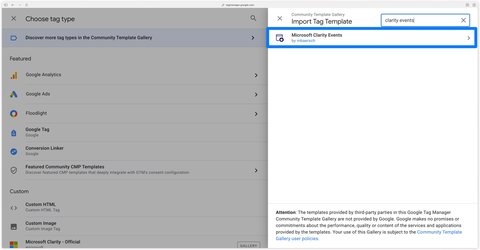
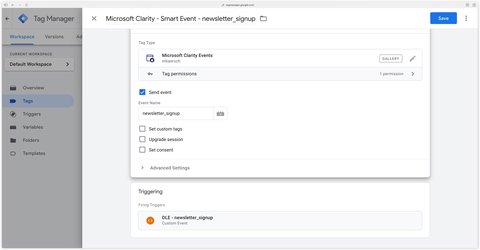
The Send event option (checked by default) sends an event to Clarity on every tag firing. Fill in an Event Name: it’s the equivalent of window.clarity('event', 'my_event') in JavaScript.
To illustrate, let’s create a tag Microsoft Clarity - Smart Event - newsletter_signup that fires on every newsletter sign-up, with only Send event checked and Event Name = newsletter_signup.
Once your Smart Events are set up, you can filter your recordings and heatmaps by these events. A few concrete examples:
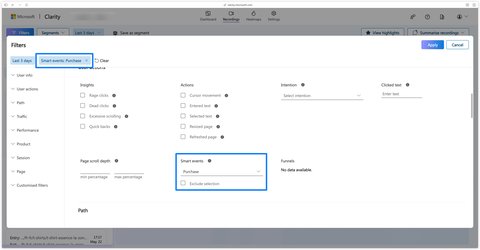
Combined with Clarity’s automatic insights (rage clicks, dead clicks, JavaScript errors), Smart Events turn the tool into a real CRO diagnosis platform.
Before you consider your deployment complete, take five minutes to validate that everything works as expected. Three successive checks are in order.
In your GTM container, click Preview at the top right. Enter your site URL and start the debug session. Browse a few pages normally.
In the Tag Assistant window that opens, verify that your Microsoft Clarity - Base Tag tag shows up in the Tags Fired column on every visited page.
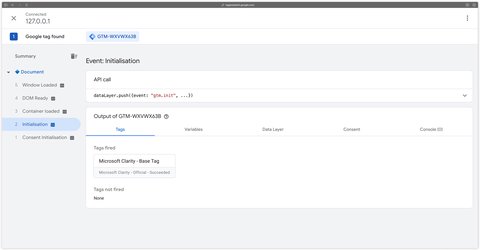
If the tag doesn’t appear in Tags Fired but does appear in Tags Not Fired, click on it to understand why: incorrect trigger, unmet consent condition, etc.
Open your browser’s developer console (F12 on most browsers) on a page of your site, then type:
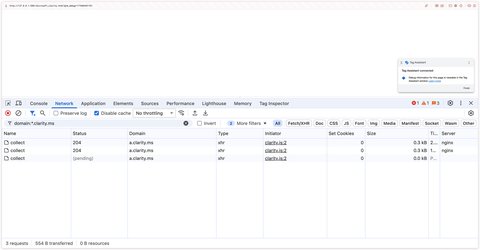
typeof window.clarityIf Clarity is properly loaded, the console should return "function". You can also inspect network requests (Network tab) and filter on clarity.ms: you should see several requests going to that domain.
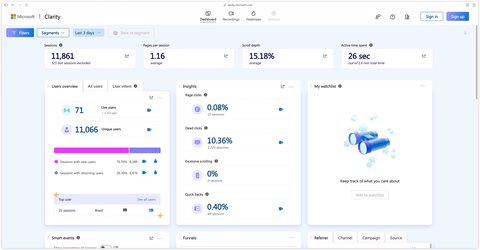
Log into your Clarity project. Go to Dashboard and verify that your data flows correctly: the sessions counter should go from zero to at least 1 after you visit the site.
Allow a few minutes between your first visit and the session showing up in the Recordings tab. Heatmaps, on the other hand, require a more meaningful traffic volume (typically a few dozen sessions) to be relevant.
Installing Microsoft Clarity with Google Tag Manager is one of the most cost-effective additions you can make to your analytics stack. In less than ten minutes, you add a complete qualitative layer to your measurement setup, on top of the quantitative data that GA4 and your other tools already provide. All of it, at zero cost and with no volume limit.
Three takeaways for a successful deployment:
Once your installation is in place, the real work begins: regularly watching your recordings, cross-referencing your heatmaps with your GA4 funnels, and testing UX improvement hypotheses. It’s this quantitative/qualitative loop that turns an average site into one that converts.
If you’d rather hand off the technical side of your Microsoft Clarity deployment, I can also help out as a Google Tag Manager freelancer: audit/diagnosis, GTM implementation, consent setup (CMP + Consent Mode v2), then ongoing monitoring and optimization to keep your tracking clean as the site evolves. Feel free to book a discovery call to discuss it!
window.clarity('event', ...)) do not count against this limit.A question about this article, need an audit of your setup or server-side migration? Drop me a line, I reply within 24h.
Guide to install the ChatGPT Ads Measurement Pixel with GTM using my OpenAI Ads Measurement Pixel by DMS tag: GA4 events, hashed user data, deduplication
Track Calendly meetings and retrieve your invitee's data (email, phone, UTM, payment, form answers) with my sGTM variable
How to accurately track Cal.com appointments with Google Tag Manager
 Lucas Rollin