Title here
Summary here
Facing key advertising challenges? Take control of your tracking: audit, optimization, GDPR compliance, CMP, Consent Mode v2, and server-side tagging.
Contact LucasUpdated: Tuesday, May 5, 2026
The aim of this article is to give you all the keys you need to determine whether implementing a Google Tag Manager server-side solution is relevant for your business, as well as the steps to follow to implement it and configure efficient server-side tracking.
Today, with the limitations linked to cookies, browsers and script blockers, client-side data collection is reaching its limits. Server-side tagging is therefore becoming an essential solution to improve data quality, optimize your website’s performance and regain control over your data flows.
To properly understand the Server-Side architecture, you need to know how Client-Side (browser-side tracking) works in more detail. This will also help you compare the two solutions later, and choose the best approach according to your tracking environment. If you’re not yet comfortable with the role of Google Tag Manager and Google Analytics in tracking, you can read this dedicated article.
Before going further, you might be interested in a more specific guide:
In its client-side version, Google Tag Manager collects data on your website through the user’s browser and sends this data to marketing platforms such as Google Analytics, Google Ads or Facebook Ads using tags and JavaScript scripts via the browser.

The browser therefore sends requests directly to the marketing platforms you work with, without going through an intermediate server. Thanks to the tracking codes, these platforms can drop first-party or third-party cookies in the browser to identify the same visitor across multiple visits and/or to link a visitor to a click on an ad.
This is what we call client-side tracking, as opposed to GTM server side where data transits through a server before being sent to marketing tools.
Client-side tracking via Google Tag Manager is still widely used today for collecting data on a website. Here are a few advantages:
Despite its advantages, client-side is showing important limitations today, especially in a context of cookie restrictions and user data protection. Here are a few drawbacks:
Google Tag Manager server side (GTM server side) is an evolution of traditional tracking that allows you to move part of the data processing to the server side rather than in the browser.
Instead of sending requests to each marketing platform server you use, you only send requests to your own server via a GTM server side container hosted in a cloud environment such as Google Cloud Platform. Your server then communicates with the marketing platforms while controlling the data flows and the events that are sent.
This makes it possible to centralize data collection, improve tracking quality and better manage the requests sent to the various marketing platforms.

Server-side tagging brings major benefits in terms of performance, data control and tracking reliability. Here’s what you need to know:
Setting up a server side environment remains technically more advanced and requires real thought about the tracking architecture.
Setting up GTM Server-Side can quickly become technical between server container, DNS, consent mode and data quality!
If you’d like to move faster on your setup or your clients’ setup, I can help you as a Freelance Google Tag Manager on GTM, GA4 and Server-Side Tracking. Whether for an audit, an implementation or fixing an existing tracking setup, you can book a discovery call to discuss your needs!
Before moving on to the configuration of Google Tag Manager Server-Side, it’s important to understand what changes compared to a classic Client-Side implementation. This understanding will help you better grasp the technical choices made in this tutorial, especially regarding the management of the server, the data and the cloud. It is precisely this shift to a server-side logic that brings new constraints, particularly tied to hosting and infrastructure.

This may sound paradoxical, but the main benefits sold with GTM Server-Side (bypassing ad-blockers, extending cookie lifespan) are not natively available when you go through Google Cloud Platform (GCP) in a standard server side configuration.
Even if you have an in-house DevOps team, setting up and maintaining such an infrastructure to keep up technically with bypassing tracking restrictions takes a lot of time and energy, and requires continuous management of the servers, requests and data flows.
To get the most out of GTM Server-Side, I strongly recommend that you delegate your Cloud management.
To do that, I’ll introduce 2 solutions (Addingwell and Stape) that handle the entire infrastructure/cloud part of a server-side implementation from A to Z (server hosting, request management and environment maintenance). This will help you choose the most appropriate solution for your needs and your level of technical maturity.
And, to choose the best solution based on your budget, your technical level and your tracking needs, check out our complete comparison: Addingwell vs Stape: server-side GTM hosting.
| Addingwell | Stape | |
|---|---|---|
| Starting at | 90 euros/month | 20 euros/month |
| Requests in the cheapest plan | 2,000,000 | 500,000 |
| Free requests | 100,000 | 10,000 |
| Support | Yes, premium (video call with an sGTM specialist) and unlimited | 1 hour of call per month, only on the Enterprise plan |
| Account Manager | Yes with the Enterprise plan | Yes with the Enterprise plan |
You now have a clearer view of how GTM server side works, of the constraints linked to cloud infrastructure and of the solutions available to simplify the setup.
It’s now time to move on to the actual configuration of your server side environment and to set up your Google Tag Manager server side container.
In the rest of this guide, we’ll go step by step through how to configure server side tracking using a cloud solution like Addingwell or Stape!
Here are the steps to configure a GTM server side container with Addingwell and set up an efficient server-side tracking environment.
This first step initializes your server side environment and prepares the configuration of your GTM server side container.
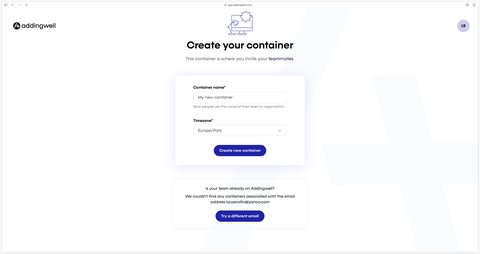
Click here to create your Addingwell account. You’re invited to create a container. This container is where GTM Server-Side will be hosted.
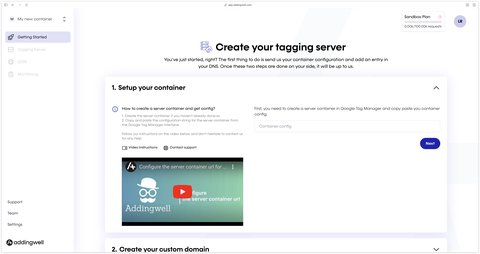
You then land on this screen, which asks for a Container Config. We’ll get this information in the next step inside GTM Server-Side.
Creating the GTM server side container is a key step to centralize data collection and manage your tags on the server side.
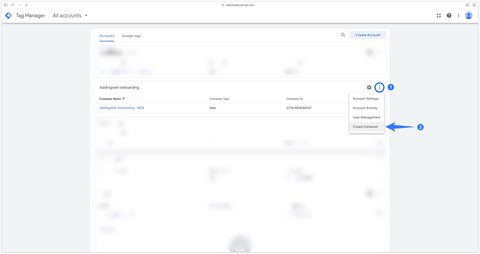
Go to tagmanager.google.com, then in the account of your choice create a Server type container.
Select Server as the Target Platform.
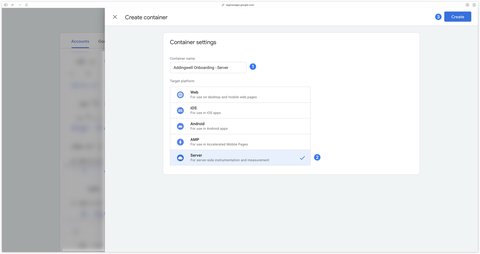
Then click Create to create your server container. You’ll then arrive on a popup where you need to select the Manually provision tagging server option. As soon as this option is selected, the Container Config appears.
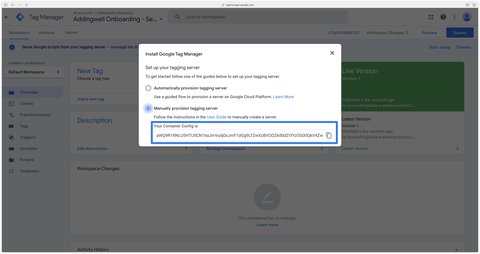
Copy the Container Config and paste it in the Addingwell interface. Then click Next.
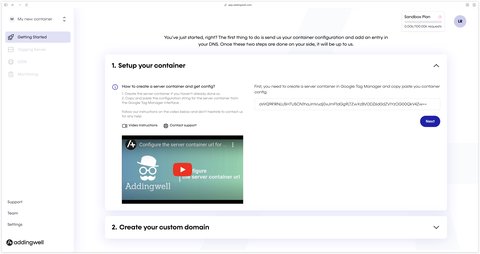
Congratulations, at this stage you’ve connected the Addingwell infrastructure with your server container on Google Tag Manager.
Configuring a custom domain helps improve server side tracking quality and reinforce the reliability of data collection.
In this part, we’ll connect a subdomain of your main domain with your Addingwell container. My main domain being data-marketing-school.com, the subdomain I’m going to choose is aw. The URL to access my tagging server will therefore be https://aw.data-marketing-school.com.
I’m choosing aw as a subdomain for the purpose of this tutorial, but I recommend choosing a neutral subdomain such as srv or server for example.
Fill in this information in Addingwell then click Next.
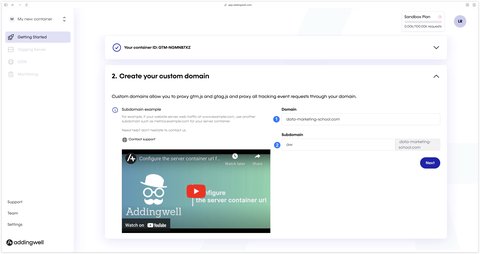
The Addingwell container is now waiting for the DNS configuration.
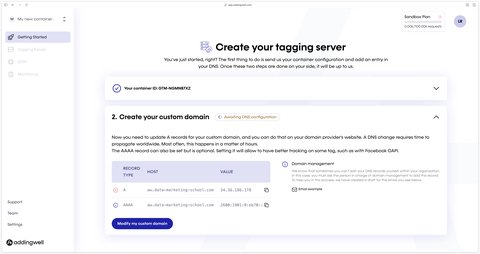
DNS configuration links your server to your domain and ensures that server side requests work correctly.
As specified in the Addingwell interface, here are the two DNS records I need to configure:
| Record Type | Host | Value |
|---|---|---|
| A | aw.data-marketing-school.com | 34.36.186.178 |
| AAAA | aw.data-marketing-school.com | 2600:1901:0:eb70:: |
The values in the Host and Value columns will probably be different for you.
The configuration of these records must be done at your DNS host. As far as I’m concerned, the DNS records of my site are managed on Cloudflare.
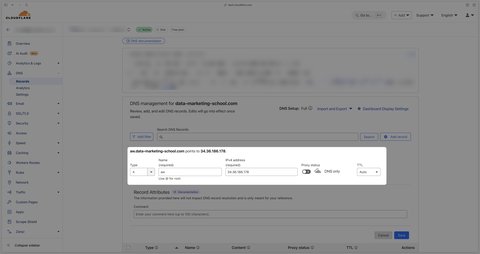
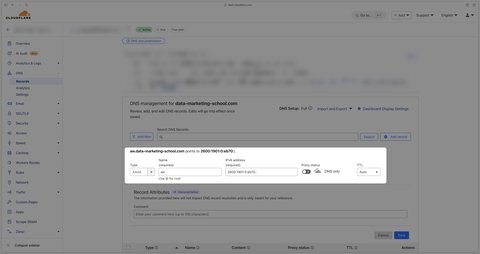
Using a dedicated subdomain (e.g.: srv.yoursite.com) helps improve cookie management and the quality of the data collected on the server side!
Congratulations, your custom domain is now configured.
This step validates the configuration of your server side environment and verifies that your tracking is working properly.
On the Addingwell side, the server is now being provisioned.
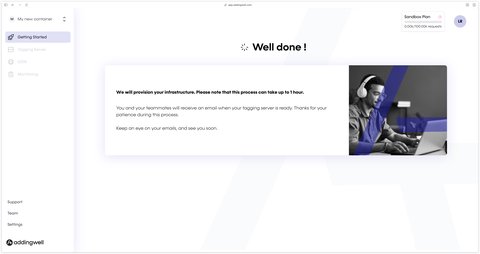
A few minutes later, your server is ready to use.
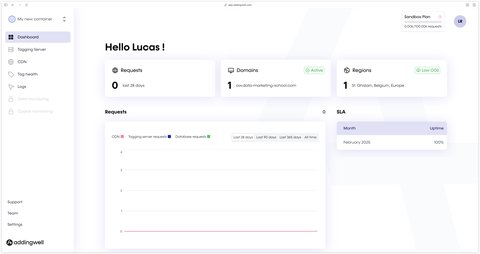
All you have left to do is specify in GTM Server-Side what your server URL is, in Admin > Container Settings.
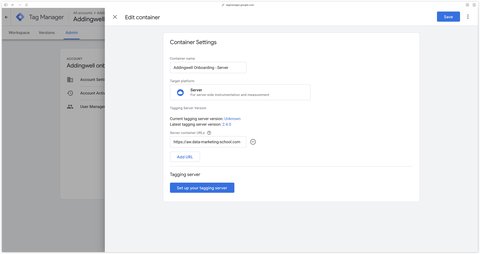
Congratulations, you’ve finished configuring your server with Addingwell. You can now open the preview on GTM Server Side and start sending requests to your server.
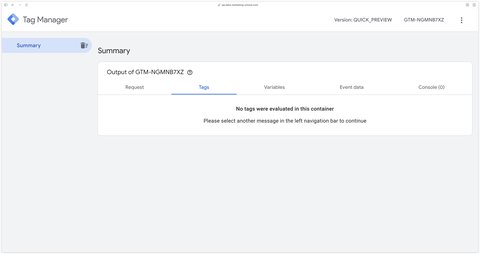
Let’s now see how to configure a GTM Server-Side environment with Stape, following the same setup steps.
The first step is to create your server-side project in Stape so you can connect your GTM Server-Side container to it.
Click here to create your Stape account, then on your Dashboard click Create sGTM container.
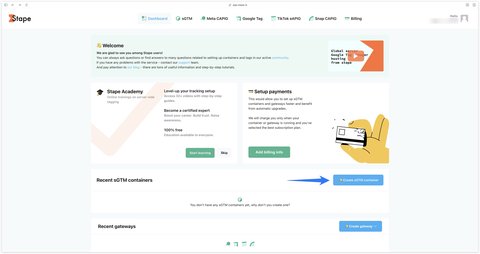
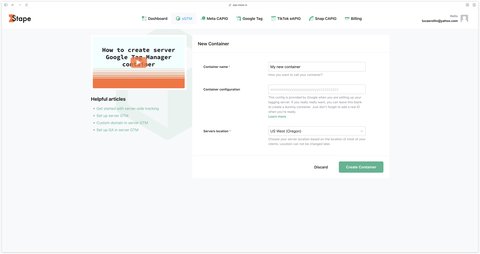
Then give your container a name and specify the server location. At this stage, you can leave the Container Config field empty, we’ll fill it in later.
Stape will then offer its pricing plans. You can go with the free plan to start.
You’ll now create the GTM Server-Side container that will receive and process the data sent from your site.
Go to tagmanager.google.com, then in the account of your choice create a Server type container.
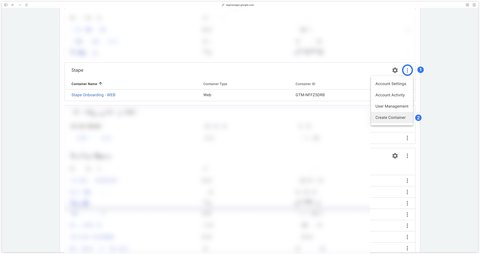
Select Server as the Target Platform.
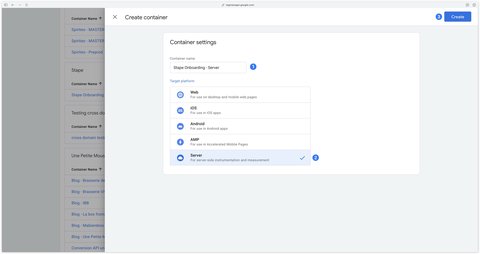
Then click Create to create your server container. You’ll then arrive on a popup where you need to select the Manually provision tagging server option. As soon as this option is selected, the Container Config appears.
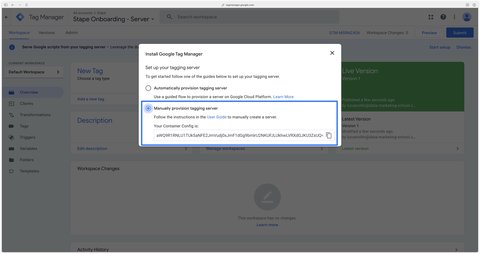
Copy the Container Config and go back to the Stape interface. In the Container settings section, click Edit.
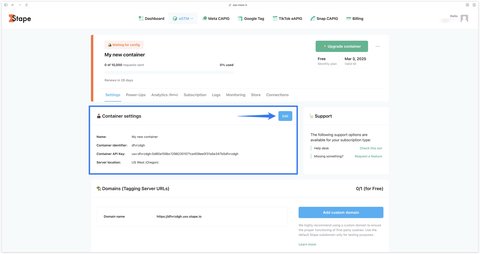
Fill in the Container Config then click Save.
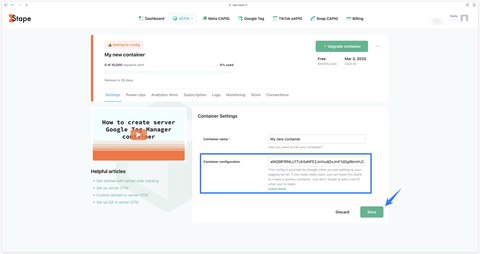
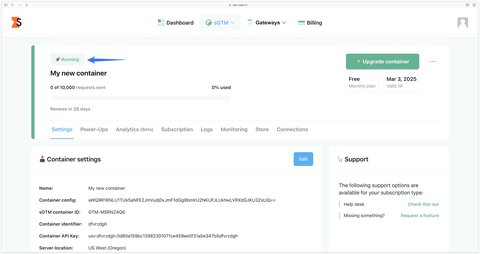
Congratulations, after a few minutes your Stape container is now in Running state. We can now move on to creating a custom domain.
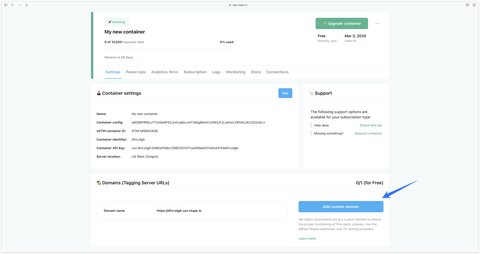
We’re going to configure a custom domain so requests transit through your own domain rather than Google’s.
In your Stape interface, click the Add custom domain button.
Fill in the URL you want for your tagging server, choose the manual connection then click Next.
Here, you can also choose the automatic connection if you can’t manage the manual configuration.
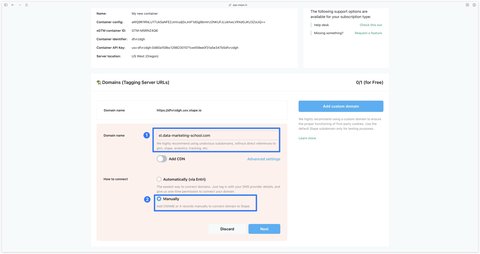
I’m choosing st as a subdomain for the purpose of this tutorial, but I recommend choosing a neutral subdomain such as srv or server for example.
Stape now offers to configure a DNS record.
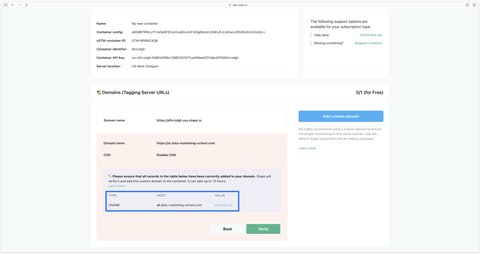
This step makes your domain point to your server so that Server-Side tracking works properly.
As specified in the Stape interface, here is the DNS record I need to configure:
| Record Type | Host | Value |
|---|---|---|
| CNAME | st.data-marketing-school.com | usv.stape.io |
The values in the Host and Value columns will probably be different for you.
The configuration of this record must be done at your DNS host. As far as I’m concerned, the DNS records of my site are managed on Cloudflare.
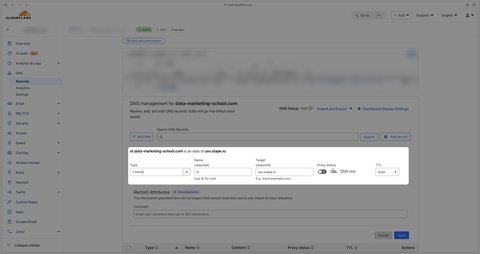
Go back to the Stape interface and click Verify. A few minutes later, your server is ready to use.
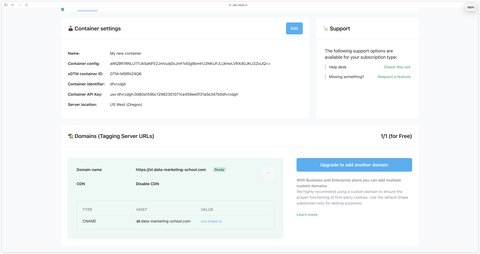
Congratulations, your custom domain is now configured.
All you have left to do is specify in GTM Server-Side what your server URL is, in Admin > Container Settings.
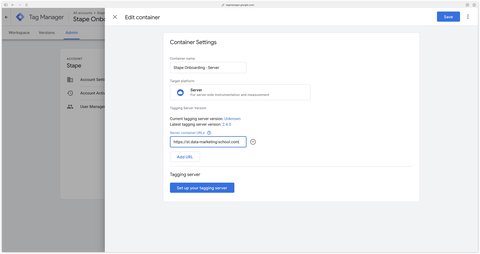
Congratulations, you’ve finished configuring your server with Stape. You can now open the preview on GTM Server Side and start sending requests to your server.
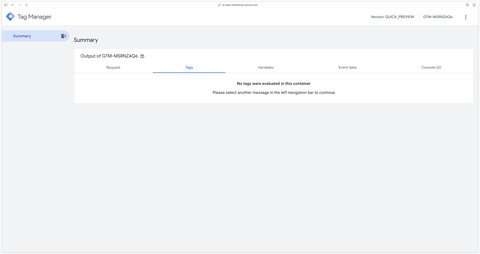
Once your GTM Server-Side environment is configured, the next step is to send the data from your website to your server in order to set up reliable tracking.
To send the data to your server, we’re going to use GA4 as the transport.
In a GTM server side setup, Google Analytics 4 is no longer just an analytics tool but also an intermediary used to transit the data to your server.
When you’re in server-side, you should no longer think of GA4 on the WEB side as an analytics tool but rather as a standard used to transport data to the server.
On the web side, you need to tell the Google tag to send data to your server. To do this, you need to add the server_container_url parameter in the configuration parameters.
As a value, you must enter the URL of your server.
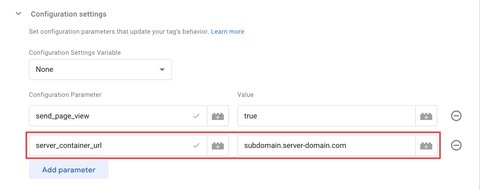
This configuration will be applied to all your GA4 events only if your Google tag fires before any event tag on the page.
If some event tags fire before the Google tag, they will use the default configuration and send requests directly to GA4 without going through your server. This will lead to data reporting issues afterwards.
To avoid this, it’s safer to add the server_container_url parameter as an event parameter on all your GA4 event tags.
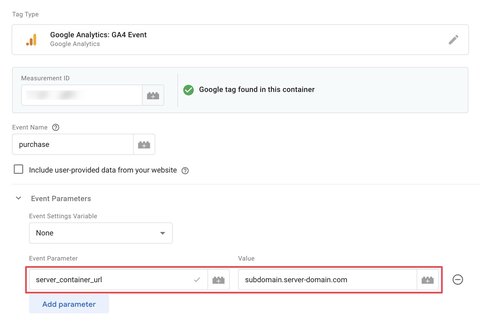
In a GTM Server-Side configuration, data is no longer sent directly from your site to the marketing platforms. It first goes through Google Analytics 4, which acts as an intermediary to transit the requests to your server.
Concretely, your website sends events via GA4, which then forwards this data to your server side container. This makes it possible to centralize data collection and to better control the information sent to the various platforms.
A good GA4 configuration is therefore essential to guarantee reliable data sending to your server and to ensure that your server side tracking works properly!
Once the data is sent via GA4, you need to configure a GA4 client in your server side container in order to be able to receive and process the requests sent from your website.
This client will analyze incoming requests and turn them into events that can be used in your GTM server side environment.
The GA4 client is present by default in a new GTM Server-Side container, which means it can directly receive the requests sent from your site via Google Analytics 4.
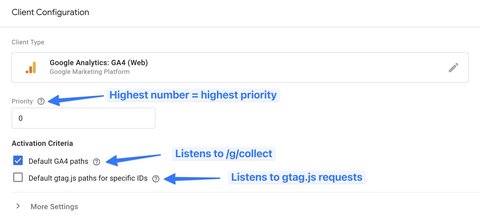
This box is checked by default. It allows the GA4 client to listen to /g/collect requests.
If you uncheck this box, the client will no longer claim GA4 event requests.
This box allows you to deliver the gtag.js files (for example the GA4 library) from your server.
This feature does not allow you to bypass ad-blockers, only to load your gtag.js libraries in a first-party context.
These elements identify users and maintain the continuity of data between the browser and the server.
When you’re on Client-Side, the cookie used by GA4 to identify a user is _ga.
When you switch to Server-Side, the cookie used by default (initial GA4 client configuration) to identify a user is FPID for First-Party IDentifier.
In the configuration you can choose to keep using the _ga cookie, to use the FPID cookie, or a mix of both.
The _ga cookie will still be used even if you’re on Server-Side.
The FPID cookie will be used.
When you’re in server-managed, you can also check the Migrate from JavaScript Managed Client ID box. This will allow you to keep using the _ga cookie for existing users while also dropping the FPID for new users.
The GA4 client is present by default in a new GTM Server-Side container. It receives the requests sent from your website via Google Analytics 4 and turns them into events that can be used in your server container.
A client listens to the requests arriving on your server. If it recognizes a request as its own (for example, the GA4 client recognizes requests on /g/collect), then it will “Claim” it (the official term, meaning “this one is mine”).
Only one client can Claim a given request. In other words, the same request cannot be claimed by several clients at the same time.
A client has a priority. The client with the highest priority is the most prioritized.
Once a client has Claimed a request, it retrieves the information inside it to extract an event name and event data that can be used by tags to forward this data and/or fire.
Concretely, the client acts as an entry point in your server side environment: it structures the data before it’s processed by your server-side tags.
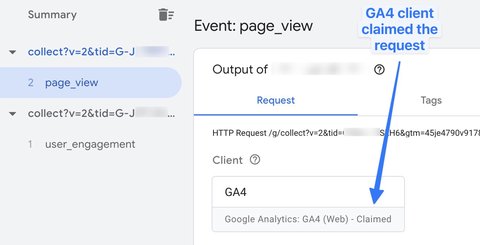
Once the data has been received and processed by the GA4 client, you need to configure a GA4 tag on the server side to forward this data to your Google Analytics 4 property.
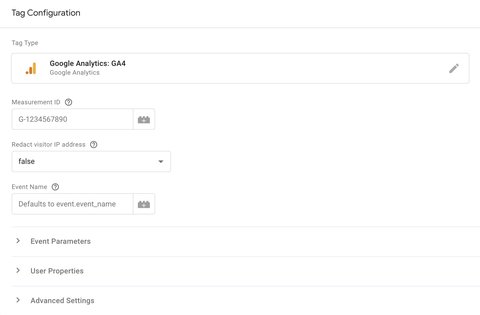
Since we use the GA4 data standard to send data to the server, configuring the GA4 tag is fairly simple because it acts as a pass-through to send the data to your GA4 property.
To simply forward the data to GA4, you can create the tag and leave the configuration empty.
The GA4 tag on the server side therefore acts as an exit point: it picks up the events processed in your server side container and sends them to your GA4 property.
To configure a GA4 tag on the server side, simply create a new tag in your server side container and select the Google Analytics: GA4 tag type.
In most cases, no advanced configuration is needed: the tag will automatically pick up the data processed by the GA4 client and forward it to your Google Analytics 4 property.
You can then associate this tag with a trigger so it fires on the events you want. Here the condition is Client Name = GA4 so that the tag fires every time the GA4 client Claims a request (i.e., on every GA4 event).
Once your configuration is in place, it’s essential to verify that data is properly received, processed and sent by your server. This step ensures that your server side tracking works as expected and that events are properly forwarded to the various platforms.
If you’ve configured Consent Mode on the WEB side and you use the GA4 standard to send data to your server, the server-side tags will automatically take Consent Mode into account.
This makes it possible to adapt tag behavior based on user consent, even in a server side tracking environment.
Consent mode values are sent in the GA4 request via the gcs and gcd parameters.
These values are then extracted by the GA4 client, which exposes them in event data via the x-ga-gcs and x-ga-gcd parameters. You can also find the gcd parameter in x-sst-system_properties.gcd.
These are the parameters that adjust the behavior of Google tags (GA4, Google Ads and Floodlight) on the server side.
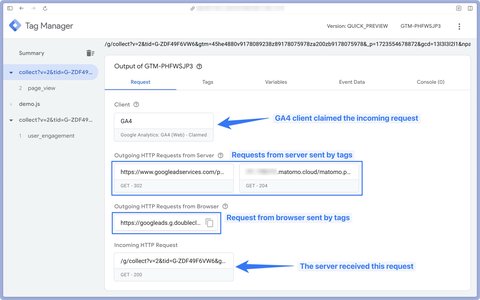
Here you can see which client claimed the request, as well as the incoming and outgoing requests of your server.
Some tags send requests back to the browser, for example Google Ads tags.
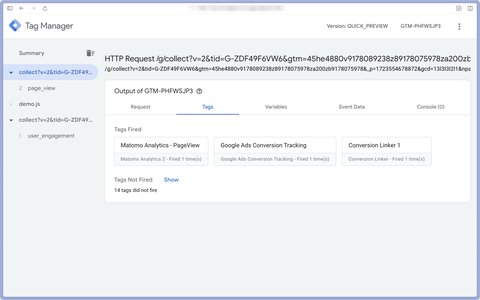
As in the Tag Assistant on the WEB side, you can see here the tags that fired and those that didn’t.
Variables allow you to leverage event data and use it in your server-side tags.
As on GTM WEB, there are built-in variables and also user-defined variables on the server side.
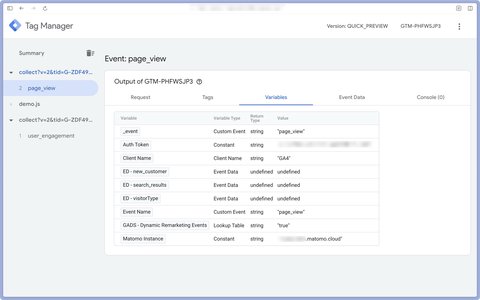
As a reminder, built-in variables are existing variables that you can enable or disable in your container.
User-defined variables are variables you have to configure yourself. For example, the Event Data variable type is useful on the server side to fetch a specific parameter from the event data.
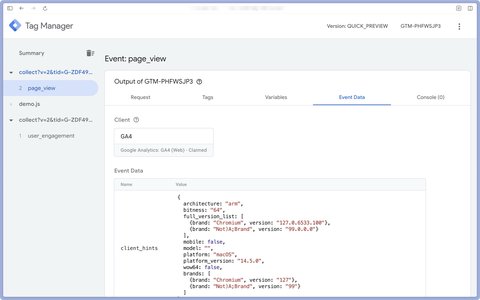
Event data is all the parameters that have been picked up from the incoming GA4 request.
As a reminder, this event data is generated by the GA4 client.
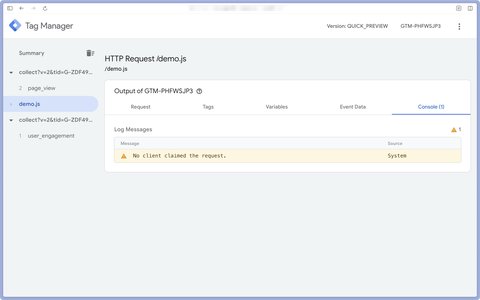
The console displays messages sent by tags when they fire.
These messages can be info, warnings or errors.
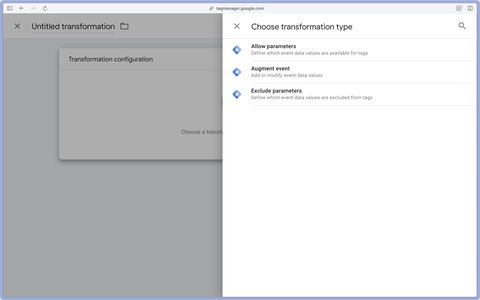
With transformations, you can add, modify or exclude parameters in event data.
As soon as a transformation is applied, tags will use the transformed parameters and no longer the original event data.
You now have the basics to set up Server-Side tracking with Google Tag Manager! In practice, between configuring the server container, the custom domain, the tests, the Consent Mode and ensuring data reliability, the setup can quickly become technical and complicated.
If you want to save time and start with a clean configuration, I can help you as a Freelance Google Tag Manager on GTM, GA4 and Server-Side Tracking. Whether for an audit, an implementation or improving an existing setup, you can book a discovery call so we can talk together!
A question about this article, need an audit of your setup or server-side migration? Drop me a line, I reply within 24h.

How much does a GTM Server-Side setup cost? Hosting, configuration, maintenance: let's break down the real spending categories and the return on investment.

Track Calendly meetings and retrieve your invitee's data (email, phone, UTM, payment, form answers) with my sGTM variable

Two alternatives to Addingwell.
 Lucas Rollin