Title here
Summary here
Facing key advertising challenges? Take control of your tracking: audit, optimization, GDPR compliance, CMP, Consent Mode v2, and server-side tagging.
Contact LucasInstalling Google Tag Manager on Shopify lets you centralize the management of your marketing tags and track what happens in your store: a product view, an add to cart, a checkout start or a purchase.
In short
You are going to learn how to install GTM on your Shopify site, how to set up the dataLayer and how to collect events from both the theme and the checkout funnel with the Addingwell GTM & DataLayer app.
Google Tag Manager lets you centralize the marketing and analytics tags installed on your Shopify store. Instead of adding each tracking snippet separately in the theme, you can configure and run a large part of your tracking from a single GTM container.
Once Google Tag Manager is properly installed on your Shopify site, you can notably:
The value of GTM is therefore not limited to making it easier to install measurement tools. It also helps you structure data collection and get a clearer picture of each step in the purchase journey.
On Shopify, this installation does require a specific setup. Since Checkout Extensibility rolled out, the store theme and the checkout pages no longer run in the same environment.
Before moving on to installing Google Tag Manager, it is therefore worth understanding what Shopify has changed!
Before getting to the GTM setup, let’s go back over the changes that reshaped tracking management and page customization on Shopify.
The migration to Checkout Extensibility brought significant changes to the way tracking is done on Shopify. This shift mainly affects data collection on the checkout and thank you pages.
The most important change is the introduction of a sandboxed JavaScript environment for the checkout page and the thank you page. In practice, scripts running in your Shopify store theme do not automatically have access to those pages. This isolated environment restricts certain JavaScript capabilities in order to strengthen security, stability and user data protection.
To get tracking working, you now have to listen to customer events to know what happens on the pages inside the sandboxed environment. Those events let you track, among other things, the start of the checkout, the submission of payment information and the completion of a purchase. The data collected can then be pushed to the dataLayer and used by the tags configured in Google Tag Manager.
The migration to Checkout Extensibility also changes how the pages inside the sandboxed environment can be customized.
The GTM setup therefore depends on which part of the store you are dealing with: the code can be embedded in the theme for the regular pages of the site, while tracking the checkout requires going through customer events and a custom pixel.
Before the migration to Checkout Extensibility, customization options already depended on the Shopify plan in use. Shopify Plus stores could edit the checkout.liquid file, while the other plans had more limited access to the checkout pages:
| Feature | Standard Shopify | Shopify Plus |
|---|---|---|
| Customize the theme | ✅ through theme.liquid | ✅ through theme.liquid |
| Customize the checkout page | ❌ | ✅ through checkout.liquid |
| Customize the thank you page | ✅ through the additional scripts section. | ✅ through the additional scripts section. |
Those options have changed. The additional scripts section can no longer be edited, and the thank you page is now customized from the checkout editor, including outside Shopify Plus:
| Feature | Standard Shopify | Shopify Plus |
|---|---|---|
| Customize the theme | ✅ through theme.liquid | ✅ through theme.liquid |
| Customize the checkout page | ❌ | ✅ through Checkout Extensibility |
| Customize the thank you page | ✅ through Checkout Extensibility | ✅ through Checkout Extensibility |
Customizing the Information, Shipping and Payment steps of the checkout is still reserved for Shopify Plus stores. The Thank you and Order status pages, on the other hand, can be customized on every plan, using blocks and web pixels added in the checkout and accounts editor.
Good to know
Since 28 August 2025, the additional scripts section is read-only: it can no longer be edited. Non-Plus stores also had to migrate their old Thank you and Order status pages to the new version before 26 August 2026. If your store still shows an upgrade notice under Settings > Checkout, your old tracking customizations are most likely no longer running.
Installing GTM on Shopify means setting up the Google Tag Manager container, the Addingwell GTM & DataLayer app and a custom pixel. Here is the process to connect those pieces to your store.
Before starting the installation, you need a Google Tag Manager account and a Web container associated with your Shopify site.
Head over to Google Tag Manager, sign in with your Google account and select your store’s container. If you don’t have one yet, create a GTM account and add a new container, choosing Web as the target platform.
You then get an identifier in the GTM-XXXXXXX format. Keep this GTM ID at hand: you will need it when configuring the Addingwell app.
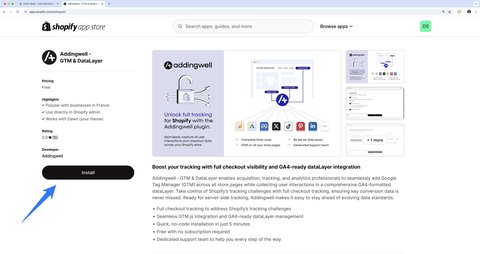
Click here to download the app that installs GTM and the DataLayer on your Shopify store.
Check that you are connected to the right store, then click Install.
The app adds Google Tag Manager to your Shopify site pages and generates a dataLayer built for the main e-commerce events.
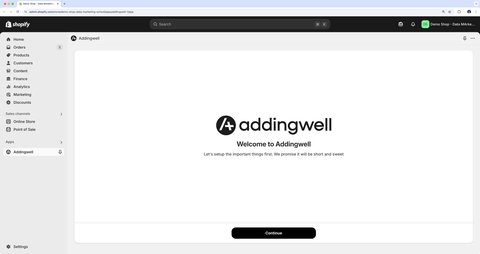
Once the app is installed you land on this page. Click Continue to start configuring it.
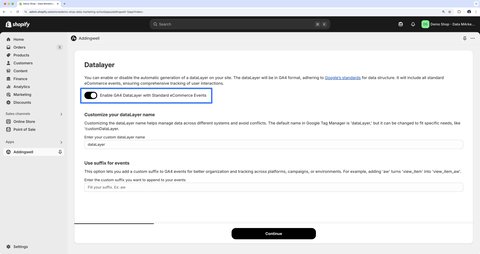
On the next step, tick the Enable GA4 DataLayer with Standard eCommerce Events box.
This feature generates a dataLayer containing the standard e-commerce events needed to track your Shopify store. That information can then be used in Google Analytics 4 or by the other tags configured in GTM.
Then tick the Include GTM.js on Site Pages box and enter the ID of your GTM Web container (GTM-XXXXXXX).
Double-check that the ID you entered matches the Web container created for this store. Otherwise, the tags and triggers configured in your Google Tag Manager workspace will not run on the right site.
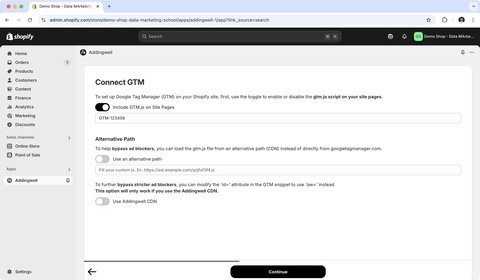
The Alternative Path section lets you get around ad-blockers; you can use this feature if you have an Addingwell account.
This option loads the GTM file from an alternative path rather than from the domain Google normally uses. It requires an Addingwell setup compatible with server-side tracking.
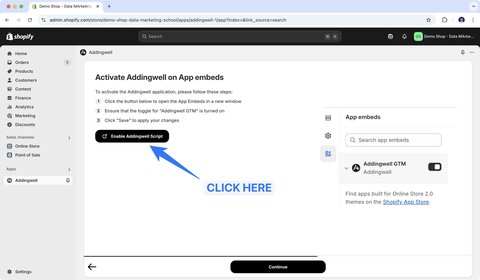
You now have to enable the Shopify app in your store’s theme. To do so, click the Enable Addingwell Script button. This activation is what loads the GTM code and the dataLayer on the regular pages of your Shopify site.
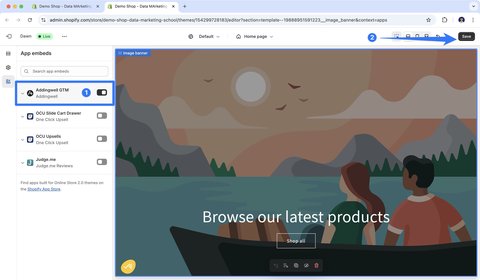
Then enable the Addingwell GTM app in the theme editor. Save, then go back to the Addingwell app configuration.
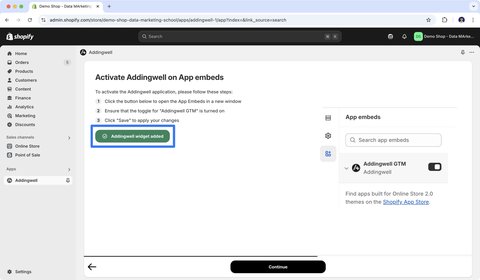
A message appears in the app confirming it has been activated in the theme. Make sure this confirmation shows up before going any further. Without this activation, Google Tag Manager will not be able to collect events coming from the theme pages.
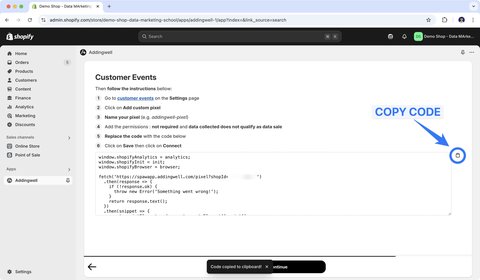
Now we add a custom pixel by copying the code shown in the app.
This pixel is what runs the tracking inside Shopify’s sandboxed environment and collects the events generated during the checkout and on the thank you page.
Then go to Settings > Customer events and click Add custom pixel. The Customer events section is where Shopify centralizes the pixels used to track what visitors do on your store.
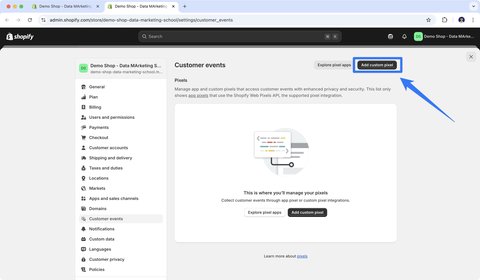
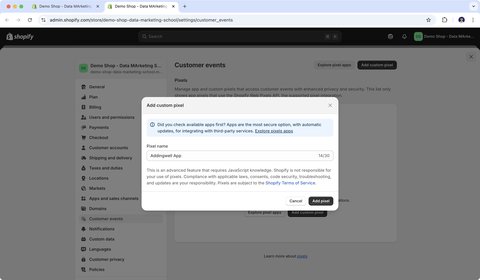
Give your custom pixel whatever name you like.
My advice
Pick a name explicit enough, such as Addingwell GTM, so that you can easily find this pixel again if you ever need to change your setup!
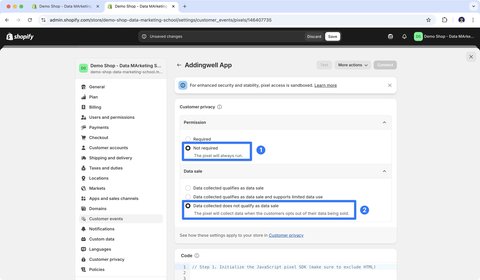
In the Customer privacy section, tick the boxes as shown in the screenshot below.
The idea here is to remove the dependency between the custom pixel and Shopify’s Customer Privacy API. That way your custom pixel always fires. If you need to handle user consent, you can do it in Google Tag Manager afterwards.
Warning
This setup does not exempt you from collecting and respecting user consent. Google Analytics, Google Ads and other marketing tags must stay blocked as long as the required consent has not been obtained, for instance through a CMP properly wired to Google Tag Manager.
Then paste the code you copied from the Addingwell app and click Save. Check that the whole snippet has been pasted into the right section before saving the pixel.
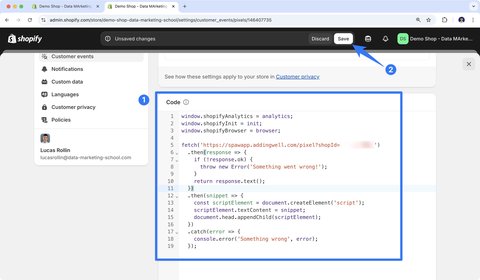
Then click Connect to connect the custom pixel to the sandbox. The pixel status should switch to Connected. This connection is what allows it to listen to the customer events generated inside Shopify’s sandboxed environment.
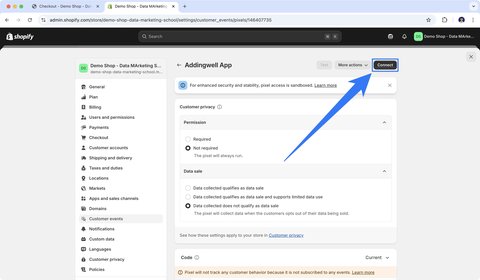
Congratulations, you have finished configuring the Addingwell GTM & DataLayer app. The dataLayer is now available in your theme and in the sandbox pages too (checkout + thank you page)!
Before configuring your Google Analytics 4 tags, Google Ads or your other marketing tools, check the following:
Installing GTM on Shopify is now done. The next step is checking that events actually show up in the dataLayer, both in the theme and in the sandbox.
You now have every step needed to install Google Tag Manager on Shopify. The setup can still get technical once you have to connect the theme, the checkout, the dataLayer, custom pixels and consent management.
Once Google Tag Manager is installed, the Addingwell app feeds the dataLayer with the events generated on your Shopify store.
You can then use that data to fire your tags and analyze each step of the purchase journey.
The app converts Shopify’s standard events into GA4-formatted dataLayer events. So what you find directly in the dataLayer is:
page_view,view_item_list,select_item,view_item,search,add_to_cart,view_cart,remove_from_cart,begin_checkout,add_contact_info,add_address_info,add_shipping_info,add_payment_info,purchase.Good to know
add_contact_info and add_address_info are not part of Google Analytics 4’s recommended events: they are added by the app to cover the intermediate steps of the Shopify checkout. Every other event in this list follows the standard GA4 naming convention.
Those events can carry extra information about products, variants, quantities, prices or the order itself. You can use them in GTM variables and triggers to configure your Google Analytics 4 tags, Google Ads tags or other marketing tools.
Which events you actually configure then depends on your goals and on the data that matters to your business. To build a coherent tracking plan, have a look at which Google Analytics events to track depending on your business.
Before using this data in your analyses, you need to check that the expected events show up correctly in the theme and in Shopify’s sandboxed environment.
Checking your setup is how you make sure the dataLayer is available, that Shopify events fire at the right moment and that the tags configured in Google Tag Manager receive the data you expect.
Shopify Pixel Helper is the recommended tool for checking that a custom pixel works inside the sandboxed environment. It shows, in real time, the events the pixel receives along with the associated data.
To run a test:
You can, for instance, view a product, add it to the cart and then start an order. Shopify Pixel Helper should display the matching events as you go. Note that this tool shows Shopify event names (checkout_started, payment_info_submitted, checkout_completed) rather than the GA4 names pushed to the dataLayer. Shopify recommends this tool for testing custom GTM pixels.
To debug dataLayer events in the theme you can type dataLayer in your web console or use a browser extension.
The console should display an array containing the information and events pushed to the dataLayer. Perform several actions on your Shopify site to check that the expected events appear at the right moment and that they carry the data your tracking needs.
To view the dataLayer inside the sandbox, you have to open the web console within the custom pixel you created. To do so, click top in your web console.
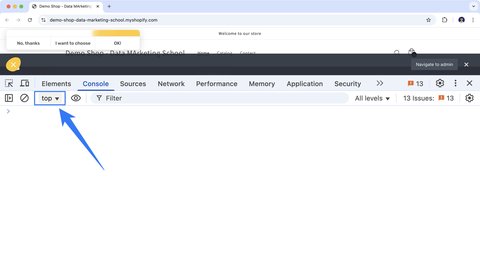
A dropdown appears; select the frame named web-pixel-sandbox-CUSTOM-{id}-LAX and type dataLayer in the console. You then get access to the dataLayer specific to the sandboxed environment. Check that the checkout events, such as begin_checkout, add_payment_info or purchase, appear when you perform the matching actions.
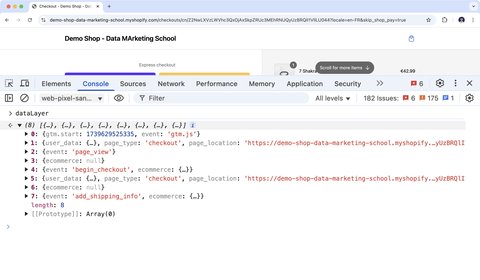
An event showing up in the dataLayer confirms that Shopify is sending the information, but it does not guarantee that the GTM tag fired, nor that the destination platform received the data.
To wrap up your checks:
Good to know
Google Tag Assistant does not detect tags loaded inside a Shopify custom pixel. For the checkout and the sandbox, you therefore have to rely on Shopify Pixel Helper and on the verification tools offered by the platforms receiving the data.
Your setup is now live and verified across the whole Shopify journey!
new_customer field tells you whether the purchase was made by a new customer or by someone who had already ordered from the store. You can pick this information up in a GTM variable and use it to analyze acquisition performance or to fire tags based on customer status.A question about this article, need an audit of your setup or server-side migration? Drop me a line, I reply within 24h.

Guide to install the ChatGPT Ads Measurement Pixel with GTM using my OpenAI Ads Measurement Pixel by DMS tag: GA4 events, hashed user data, deduplication

Install Microsoft Clarity with Google Tag Manager in 10 minutes: official tag, Consent V2 (Axeptio, Didomi) and Smart Events.
Track Calendly meetings and retrieve your invitee's data (email, phone, UTM, payment, form answers) with my sGTM variable
 Lucas Rollin