Title here
Summary here
You work in Tracking - Analytics - Data Viz - Data Eng - Media Buying?
JOIN US ON DISCORDUpdated: Monday, October 2, 2023
Forms are the biggest lead generators on the web, but they can be very difficult to track, especially if you’ve done very little HTML and CSS.
The complexity lies in tracking ONLY valid form submissions.
You may be interested in more specific guides:
In this article, I explain 5 different methods.
Before adopting a particular method, remember to check its conditions of use by carrying out the suggested diagnostic.
Each method is associated with a level of difficulty (Easy, Medium or Difficult).
Start with the conditions of use of method 1, then let us guide you until you find the method that works for you.
Level of difficulty: Easy
To check each condition, take a look at Method 1: Run the diagnosis.

Looking at your form’s HTML code, if you notice that the <form> tag contains the action attribute as in the example below, chances are your form is sending a submit event.
<form method="POST" action="https://some-url.com">
<!-- ... -->
</form>
Similarly, if you notice that the HTML code of the form submit button is type="submit", your form should send a submit event.
<form>
<input type="submit" value="Send"/>
<!-- OR -->
<button>Send</button> <!-- The <button> tag sends a submit event by default -->
<!-- OR -->
<button type="submit">Send</button>
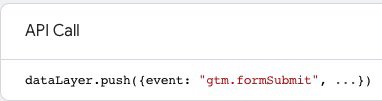
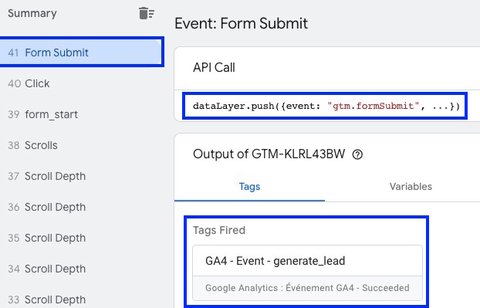
</form>Another way to find out is to monitor the gtm.formSubmit event in Google Tag Manager’s Debug Mode.
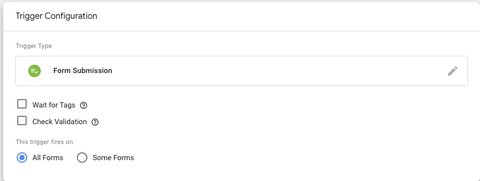
To do this, you’ll need to add the “Form Submission” trigger like this:
If the form sends a submit event, you should see this in Google Tag Manger’s Debug Mode:
 |  |
If you’ve mastered a little Javascript, to be totally sure that your form is sending a submit event, I invite you to install this code on your form page and see if an alert appears on the screen.
document.addEventListener("DOMContentLoaded", function() {
    document.querySelector("form").addEventListener("submit", function() {
        alert("Your form sends the submit event !!");
    });
});
This is what you should get if your form sends a submit event:

At this stage, you need to determine whether the form sends a submit event only when it is valid or each time it is submitted.
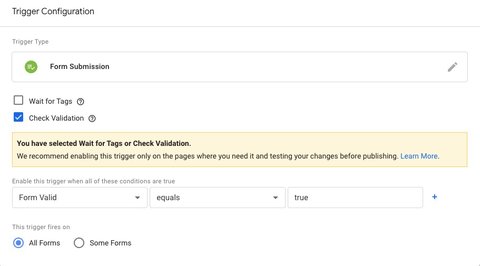
If you have access to variables that allow you to determine the validity of the form, you can check the Check Validation checkbox in the trigger.
If method 1 doesn’t work for your form, please proceed to method 2.
As seen during diagnostic, you need to use the Form Submission trigger.
Check the Check Validation checkbox only if you have a variable that allows you to determine whether the form submission is valid.
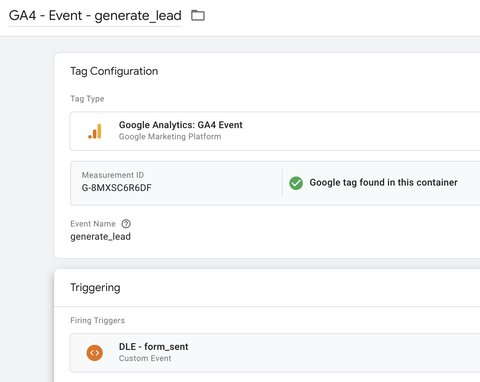
We’ll now configure GA4’s generate_lead event and link it to this trigger.
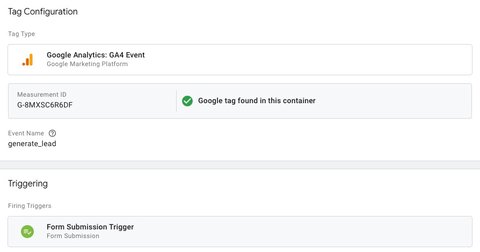
We then test the configuration using Google Tag Manager’s debug mode.
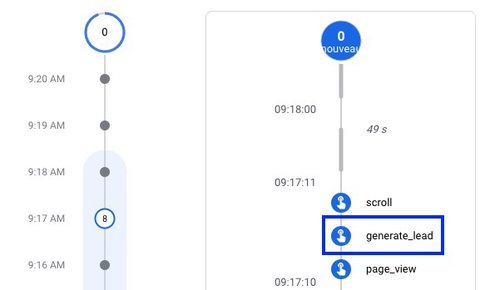
We then check that the generate_lead event has been correctly sent to GA4 using the Debug View.
Level of difficulty: Medium
To check each condition, take a look at Method 2: Run the diagnosis.

When you submit a valid form, the URL fragment may change (https://example.com/#form-sent) or you may be redirected to a confirmation page (https://example.com/confirmation-page).
On the confirmation page, you need to identify whether it’s unique by asking the developer or webmaster. And if it’s used for other forms or pages on the website, you may be able to differentiate it with the document.referrer variable.
This variable contains the previous URL that was visited. If it’s indeed the form page you want to track, then you can use method 2.
To determine this, submit the form, then right-click > Inspect on the confirmation page.
Then go to the Console tab, type document.referrer and press enter.
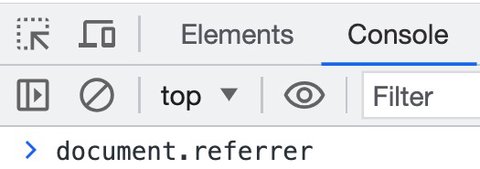
If the URL displayed is indeed that of your form page, you can continue with method 2.
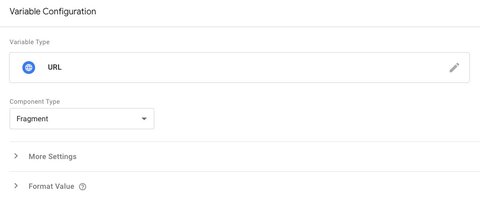
Let’s say that when you submit a valid form, the #form-sent fragment is added to the URL.
We’re going to trigger our GA4 generate_lead event only when this fragment is in the URL.
To do this, we’ll first create a Fragment variable:
Then we create a trigger on page views that contain the #form-sent fragment:

We then link the GA4 event tag to this trigger:

When you submit a valid form, you’re redirected to a single confirmation page.
We’ll create a Page View trigger with a condition on the page URL.
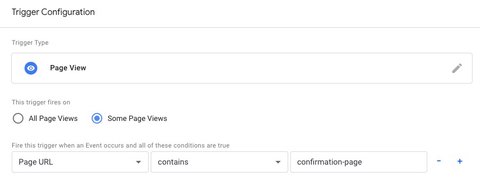
We then link the GA4 event tag to this trigger.
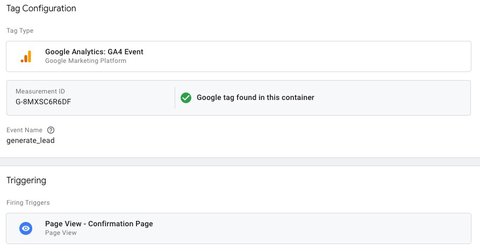
We then test the configuration in Google Tag Manager’s Debug Mode:

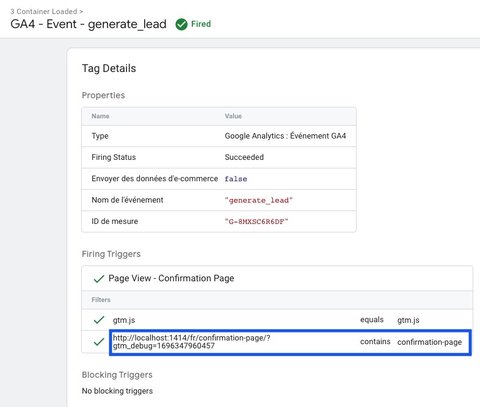
We then check that the generate_lead event has been correctly sent to GA4 using the Debug View.
We then test the configuration in Google Tag Manager’s Debug Mode:
We then check that the generate_lead event has been correctly sent to GA4 using the Debug View.
Level of difficulty: Difficult
To check each condition, take a look at Method 3: Run the diagnosis.

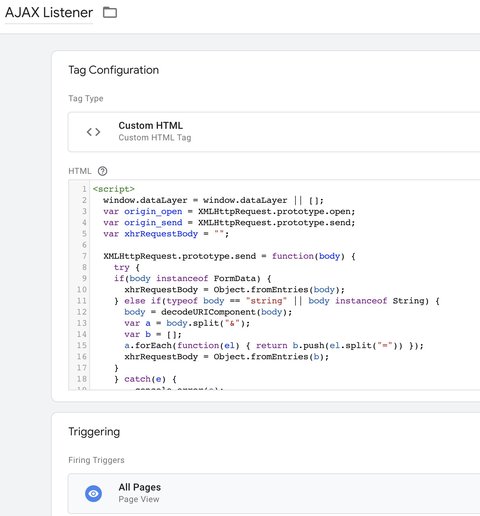
First, you need to install the code below between the <head> tags on your form page.
You can ask a developer to set it up, or do it yourself via Google Tag Manager.
<script>
  window.dataLayer = window.dataLayer || [];
  var origin_open = XMLHttpRequest.prototype.open;
  var origin_send = XMLHttpRequest.prototype.send;
  var xhrRequestBody = "";

  XMLHttpRequest.prototype.send = function(body) {
    if(body instanceof FormData) {
      xhrRequestBody = Object.fromEntries(body);
    } else if(typeof body == "string" || body instanceof String) {
      body = decodeURIComponent(body);
      var a = body.split("&");
      var b = [];
      a.forEach(function(el) { return b.push(el.split("=")) });
      xhrRequestBody = Object.fromEntries(b);
    }

    origin_send.apply(this, arguments);

  };

  XMLHttpRequest.prototype.open = function() {
      this.addEventListener('loadend', function() {
          dataLayer.push({
            event: "ajax_complete",
            requestType: "XHR",
            requestBody: xhrRequestBody || "",
            location: document.location.href || "",
            path: document.location.pathname || "",
            fragment: document.location.hash || "",
            protocol: document.location.protocol || "",
            hostname: document.location.hostname || "",
            statusCode: this.status || "",
            statusText: this.statusText || "",
            responseType: this.responseType || "",
            readyState: this.readyState || ""
          });
        });
        origin_open.apply(this, arguments);
  };

  window.fetch = new Proxy(window.fetch, {
    apply: function (target, that, args) {
      var temp = target.apply(that, args);
      temp.then(function(res) {
        dataLayer.push({
              event: "ajax_complete",
              requestType: "Fetch",
              location: document.location.href || "",
              path: document.location.pathname || "",
              fragment: document.location.hash || "",
              protocol: document.location.protocol || "",
              hostname: document.location.hostname || "",
              statusCode: res.status || "",
              statusText: res.statusText || "",
              requestedURL: res.url || ""
          });
      });
      return temp;
    },
  });
  /*
  * v0.1.0
  * Created by Data Marketing School at http://www.data-marketing-school.com
  * Written by https://www.linkedin.com/in/lucasrollin/
  */
</script>
To do this via Google Tag Manager, create a custom HTML tag, then insert the above code.
Then check in Google Tag Manager for the ajax_complete event displayed when you submit your form.
The variables transmitted with the event should also enable you to differentiate between valid and invalid form submissions.
If this is the case, you can use method 3. If not, go to method 4.
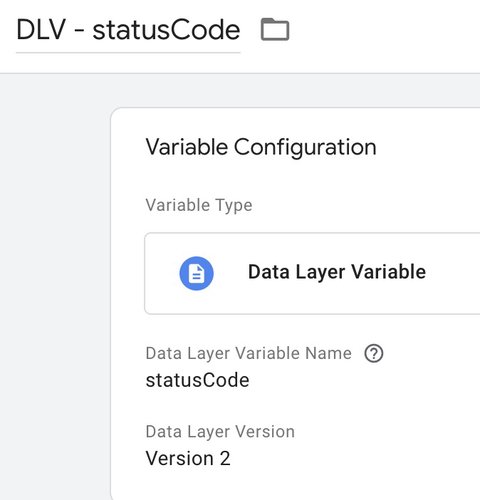
To trigger a tag following the ajax_complete event, we’ll create a custom event trigger and also create the statusText and statusCode variables in Google Tag Manager.
These variables will be used in the next section when we configure the trigger.
DLV means Data Layer Variable
 |  |
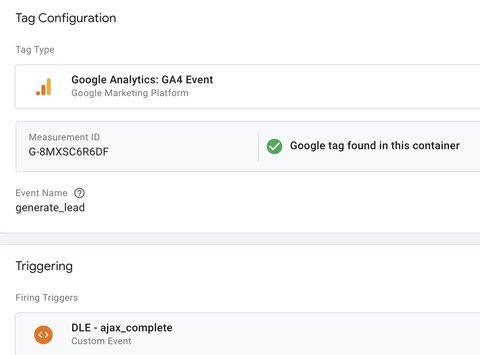
We now create the Custom event trigger on the ajax_complete event.
DLE means Data Layer Event

In this example, I’m checking that the statusCode is equal to 200. This check will depend on the statusCode sent by your form on a valid submission.
We then associate the GA4 event tag with this trigger:
We then test the configuration with Google Tag Manager’s debug mode for both valid and invalid form submission.
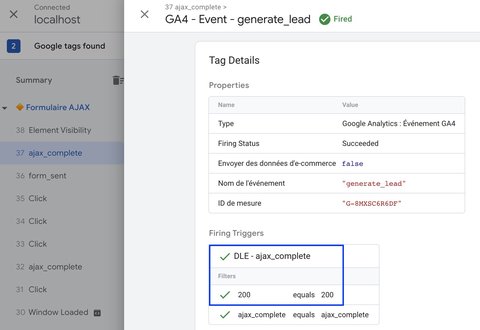
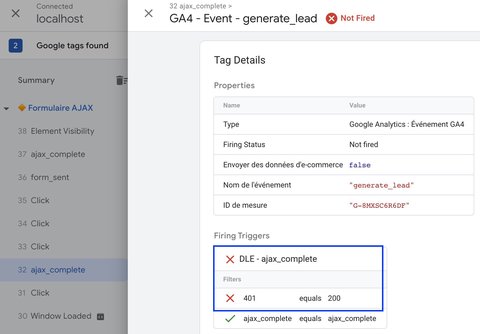
Next, we check that the generate_lead event has been sent to GA4 using the Debug View.
Level of difficulty: Medium
To check each condition, take a look at Method 4: Run the diagnosis.

Your form displays a confirmation message for valid submissions like this:

And this message is already in the HTML code when the page loads, but simply hidden by the CSS, so you can use method 4.
<p id="valid" class="rounded-sm hidden text-slate-100 bg-green-700 px-3 py-3">The form has been sent.</p>Here, the message contains the hidden class. It is hidden by default when the page is loaded and is displayed on a valid form submission.
We’ll create an Element visibility trigger to detect when the <p> tag containing the message “The form has been sent.” becomes visible.
To do this, we specify the tag id (valid) and check the “Observe DOM changes” checkbox.
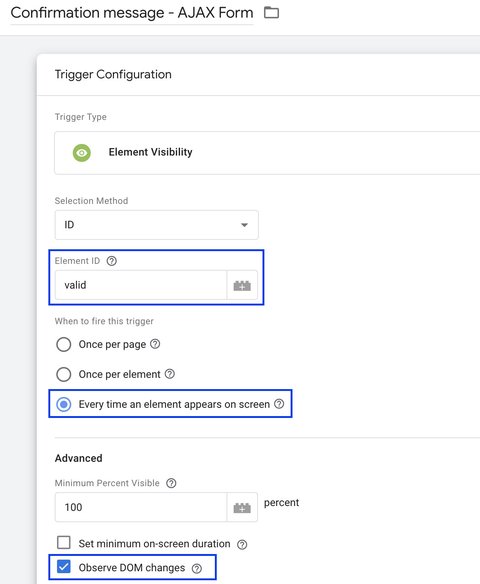
By default, the Element visibility trigger is triggered when the page is scrolled.
In the case of a form submission, there is no scroll, so it is necessary to check the “Observe DOM changes” checkbox.
We then link the GA4 event tag with this trigger:

We then test the configuration with Google Tag Manager’s debug mode for both valid and invalid form submission.
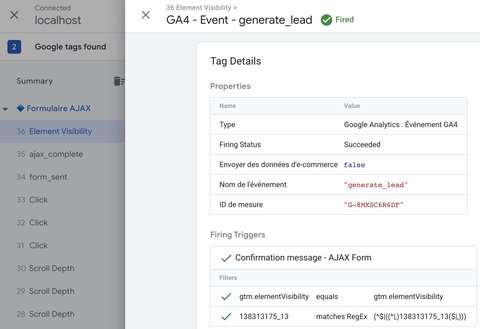
Next, we check that the generate_lead event has been sent to GA4 using the Debug View.
Level of difficulty: Medium

Ask a developer to trigger this code when a valid form submission happens:
window.dataLayer = window.dataLayer || [];
dataLayer.push({
    event: "form_sent"
});
You can modify the event name and add additional parameters if you wish to collect more information on the form.
Once your developer has implemented the code, all that’s left to do is set up a custom event trigger on the form_sent event or whatever event you want to use.

Then, we link it to the GA4 event tag:
We then test the configuration with Google Tag Manager’s debug mode for both valid and invalid form submission.
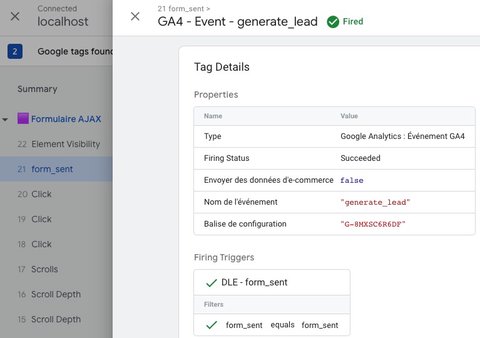
Next, we check that the generate_lead event has been sent to GA4 using the Debug View.

Guide to configuring the Tiktok Pixel with GTM and how to check its configuration
Google Tag Manager, Tiktok Ads
3 minutes

Learn how to set up custom scroll thresholds with Google Tag Manager and Google Analytics
Google Tag Manager, Google Analytics
4 minutes

How to accurately track Hubspot Forms with Google Tag Manager
Google Tag Manager, Hubspot
2 minutes